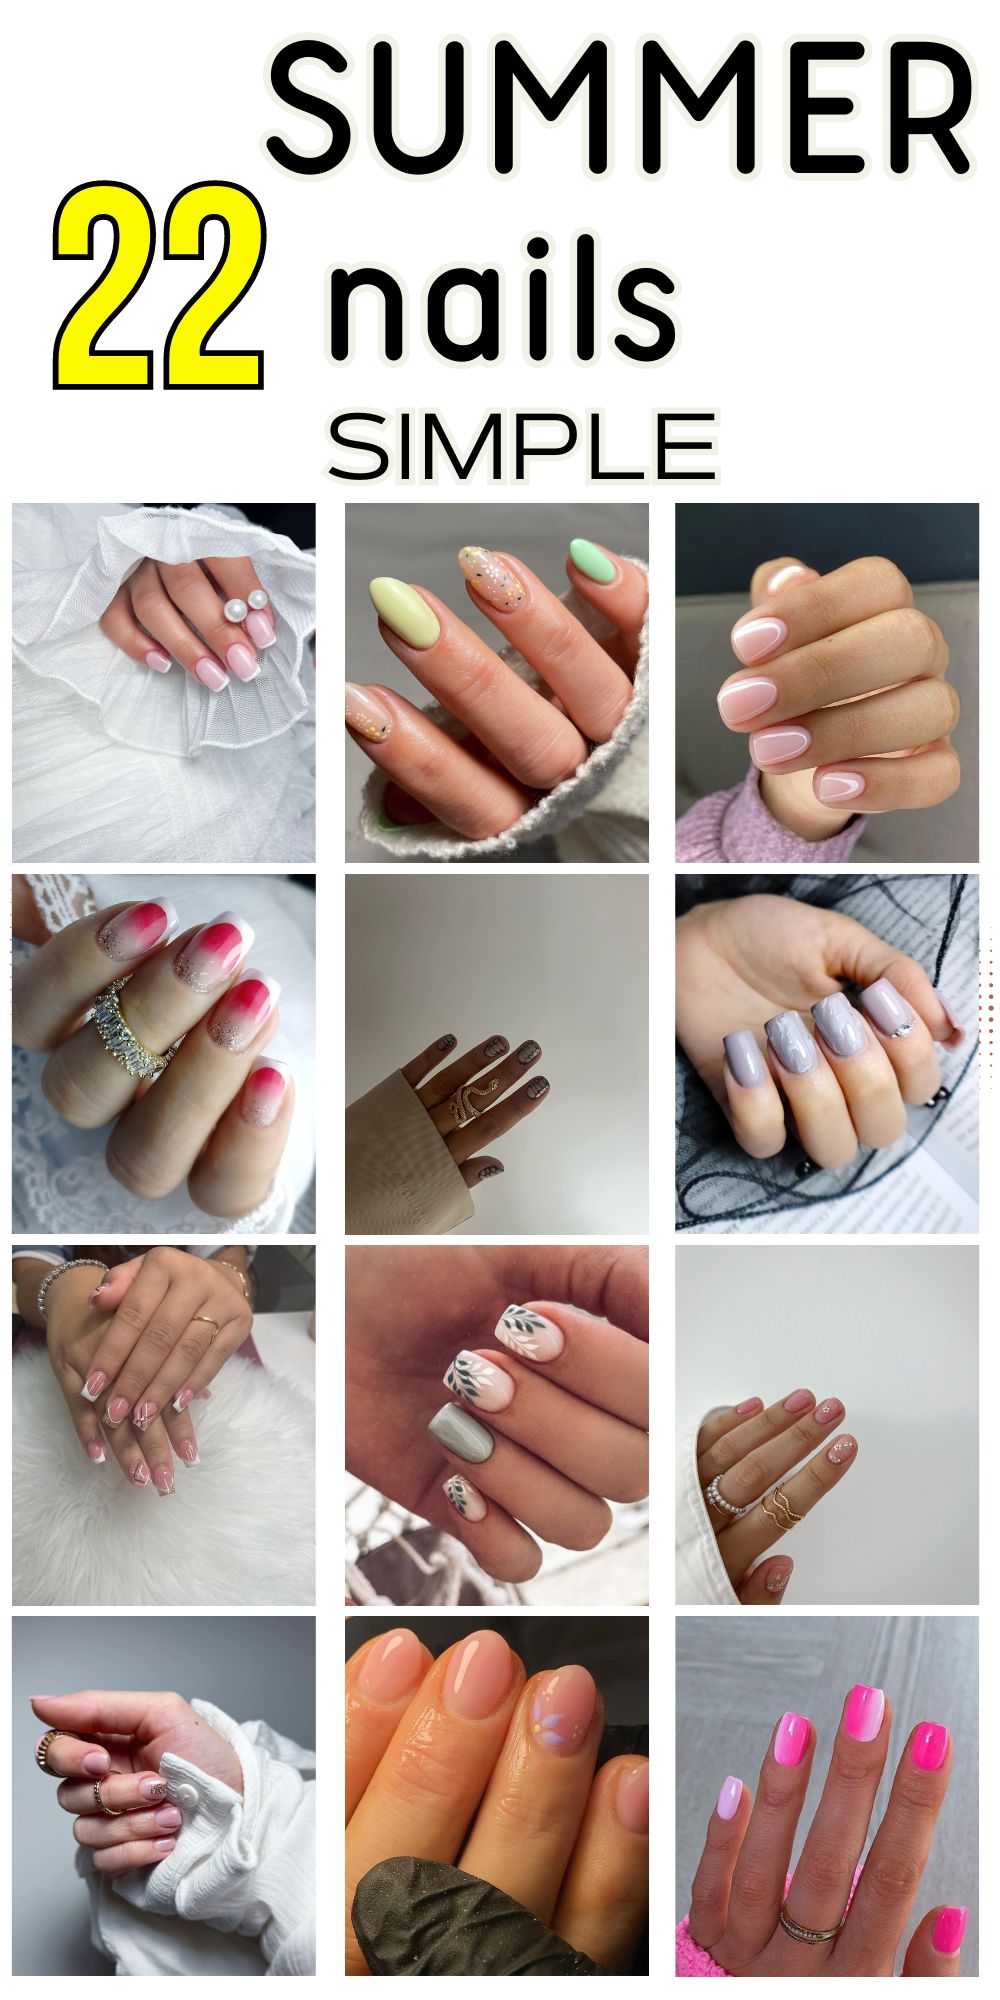
As the sun claims the sky, our style speaks in the hushed tones of summer’s warmth. Welcome to a sanctuary where simple summer nails become a canvas for expression, where the soft touch of almond shapes, the lasting embrace of acrylic, and the glossy finish of short gel designs tell tales of sunny days and balmy nights. Whether you’re an aficionado of the classic French tip or a seeker of minimalist chic, prepare to be inspired by the symphony of ideas that await.
Simple Elegance with a Pop of Color
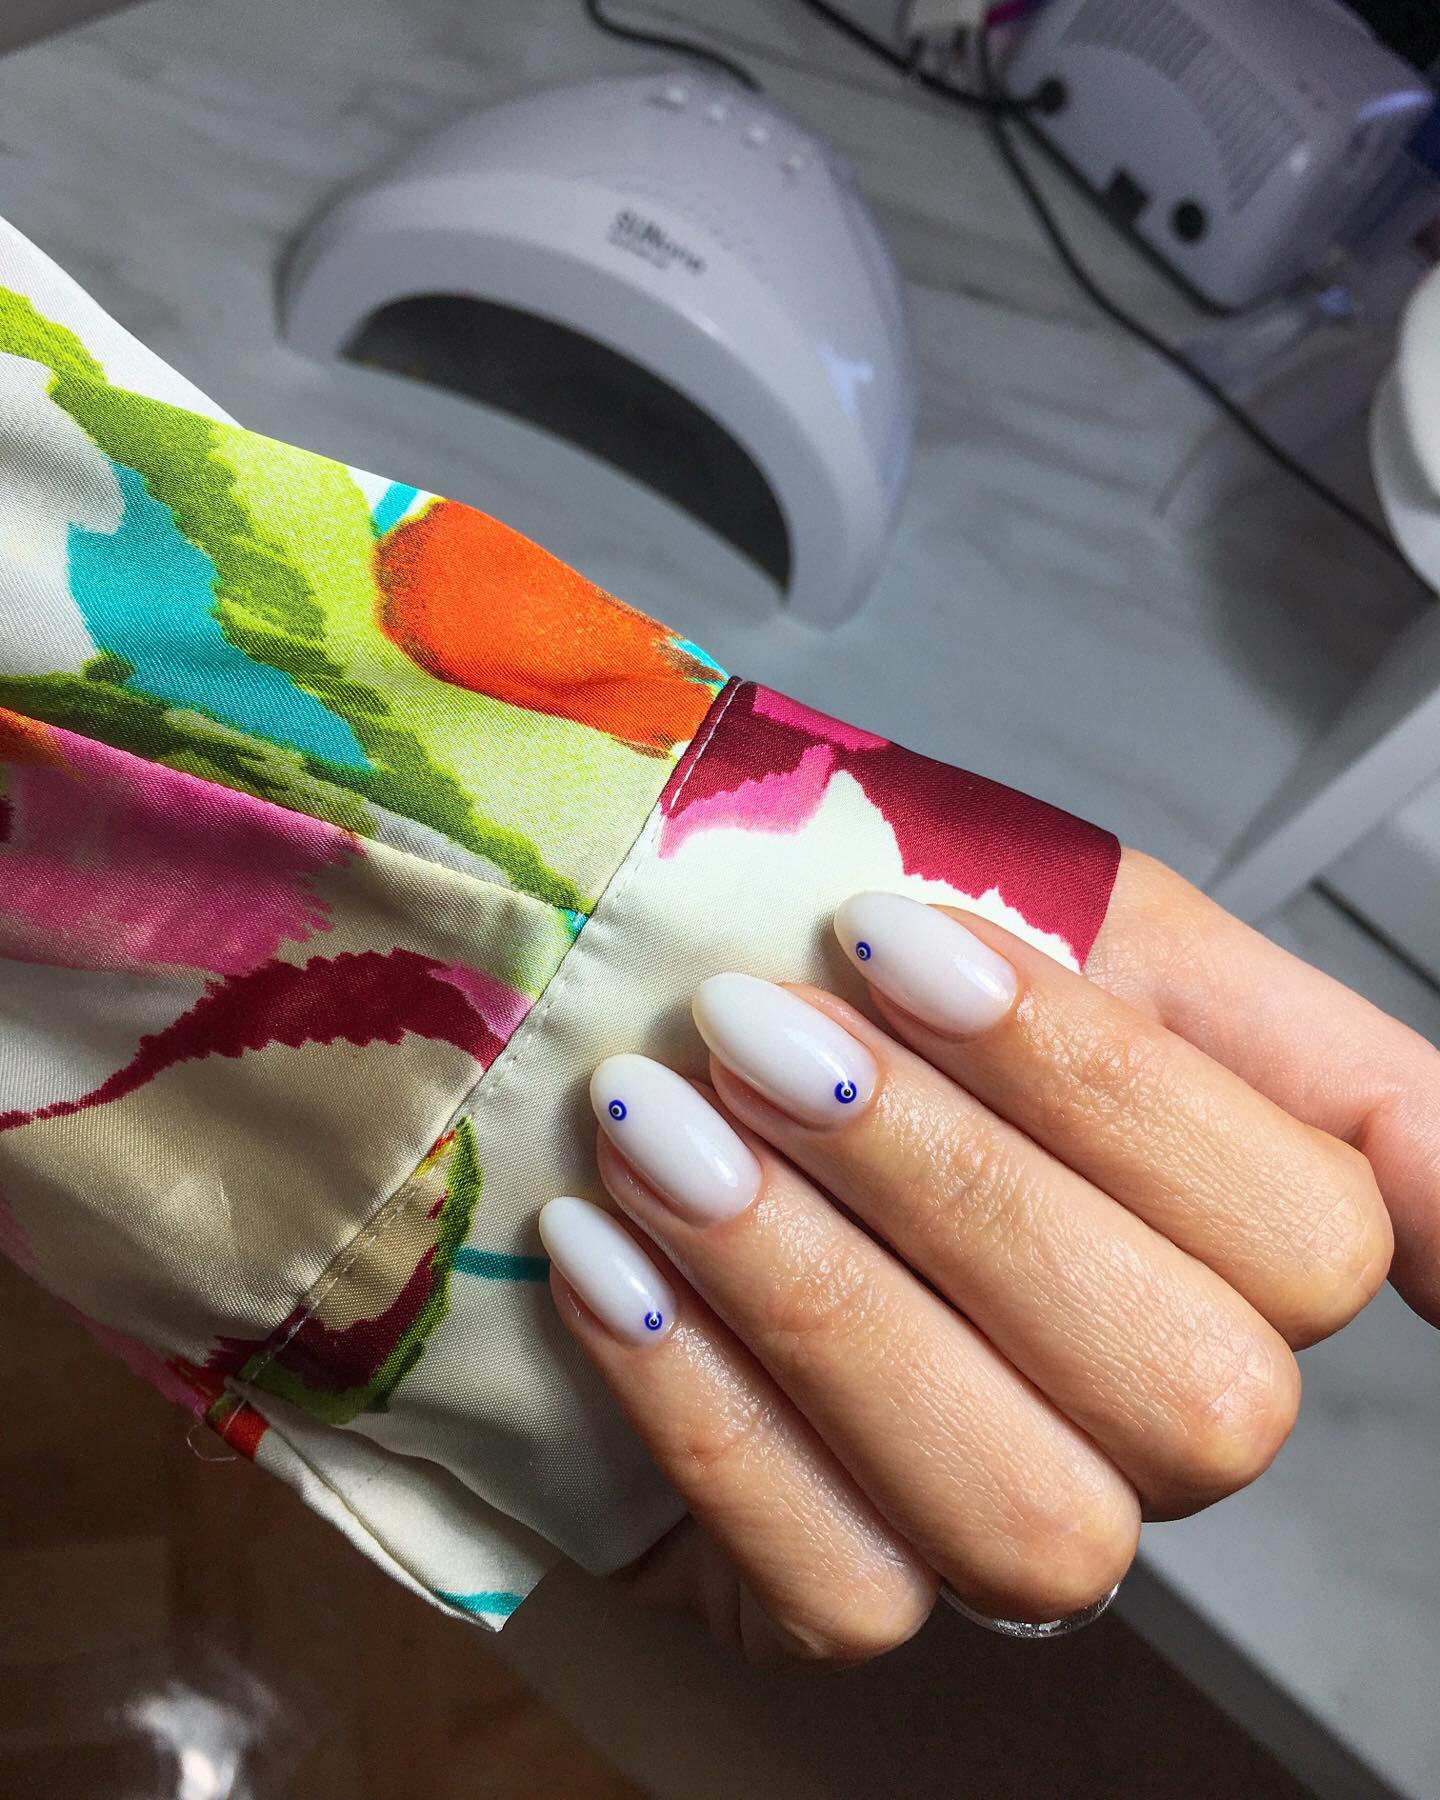
In the realm of simple summer nails, one often finds beauty in the simplest of styles. This image, showcases a pristine example of what we, as professional manicurists, consider to be the epitome of understated elegance with a playful twist. The short gel nails are painted a milky white, offering a fresh canvas that’s both minimalistic and chic. It’s a simple base that speaks volumes in terms of versatility. What truly adds a hint of summer is the singular, petite blue dot sitting at the base of each nail, like a droplet of the ocean’s own hue, bringing forth a whimsy that’s both subtle and intriguing.
Consumables needed:
- Base coat (Preferably a strengthening formula)
- Milky white gel polish (Brand Recommendation: OPI GelColor in ‘Alpine Snow’)
- Royal blue nail art polish (Brand Recommendation: Essie in ‘Butler Please’)
- Top coat (A glossy finish for that glass-like sheen)
- UV/LED lamp to cure the gel polish
Each of these products has been chosen for their quality and longevity, ensuring your simple summer nails short gel manicure stays flawless for weeks.
DIY Instructions:
- Start with clean, prepped nails. Apply a base coat and cure under a UV/LED lamp.
- Follow with two coats of the milky white gel polish, curing after each application.
- Dip a dotting tool into the royal blue polish and gently place a single dot at the base of each nail.
- Finish with a top coat and cure for a final time to seal in your design.
This design is straightforward, making it perfect for a DIY enthusiast looking for a simple summer nails idea that won’t require a trip to the salon.
Sophisticated Matte for the Modern You
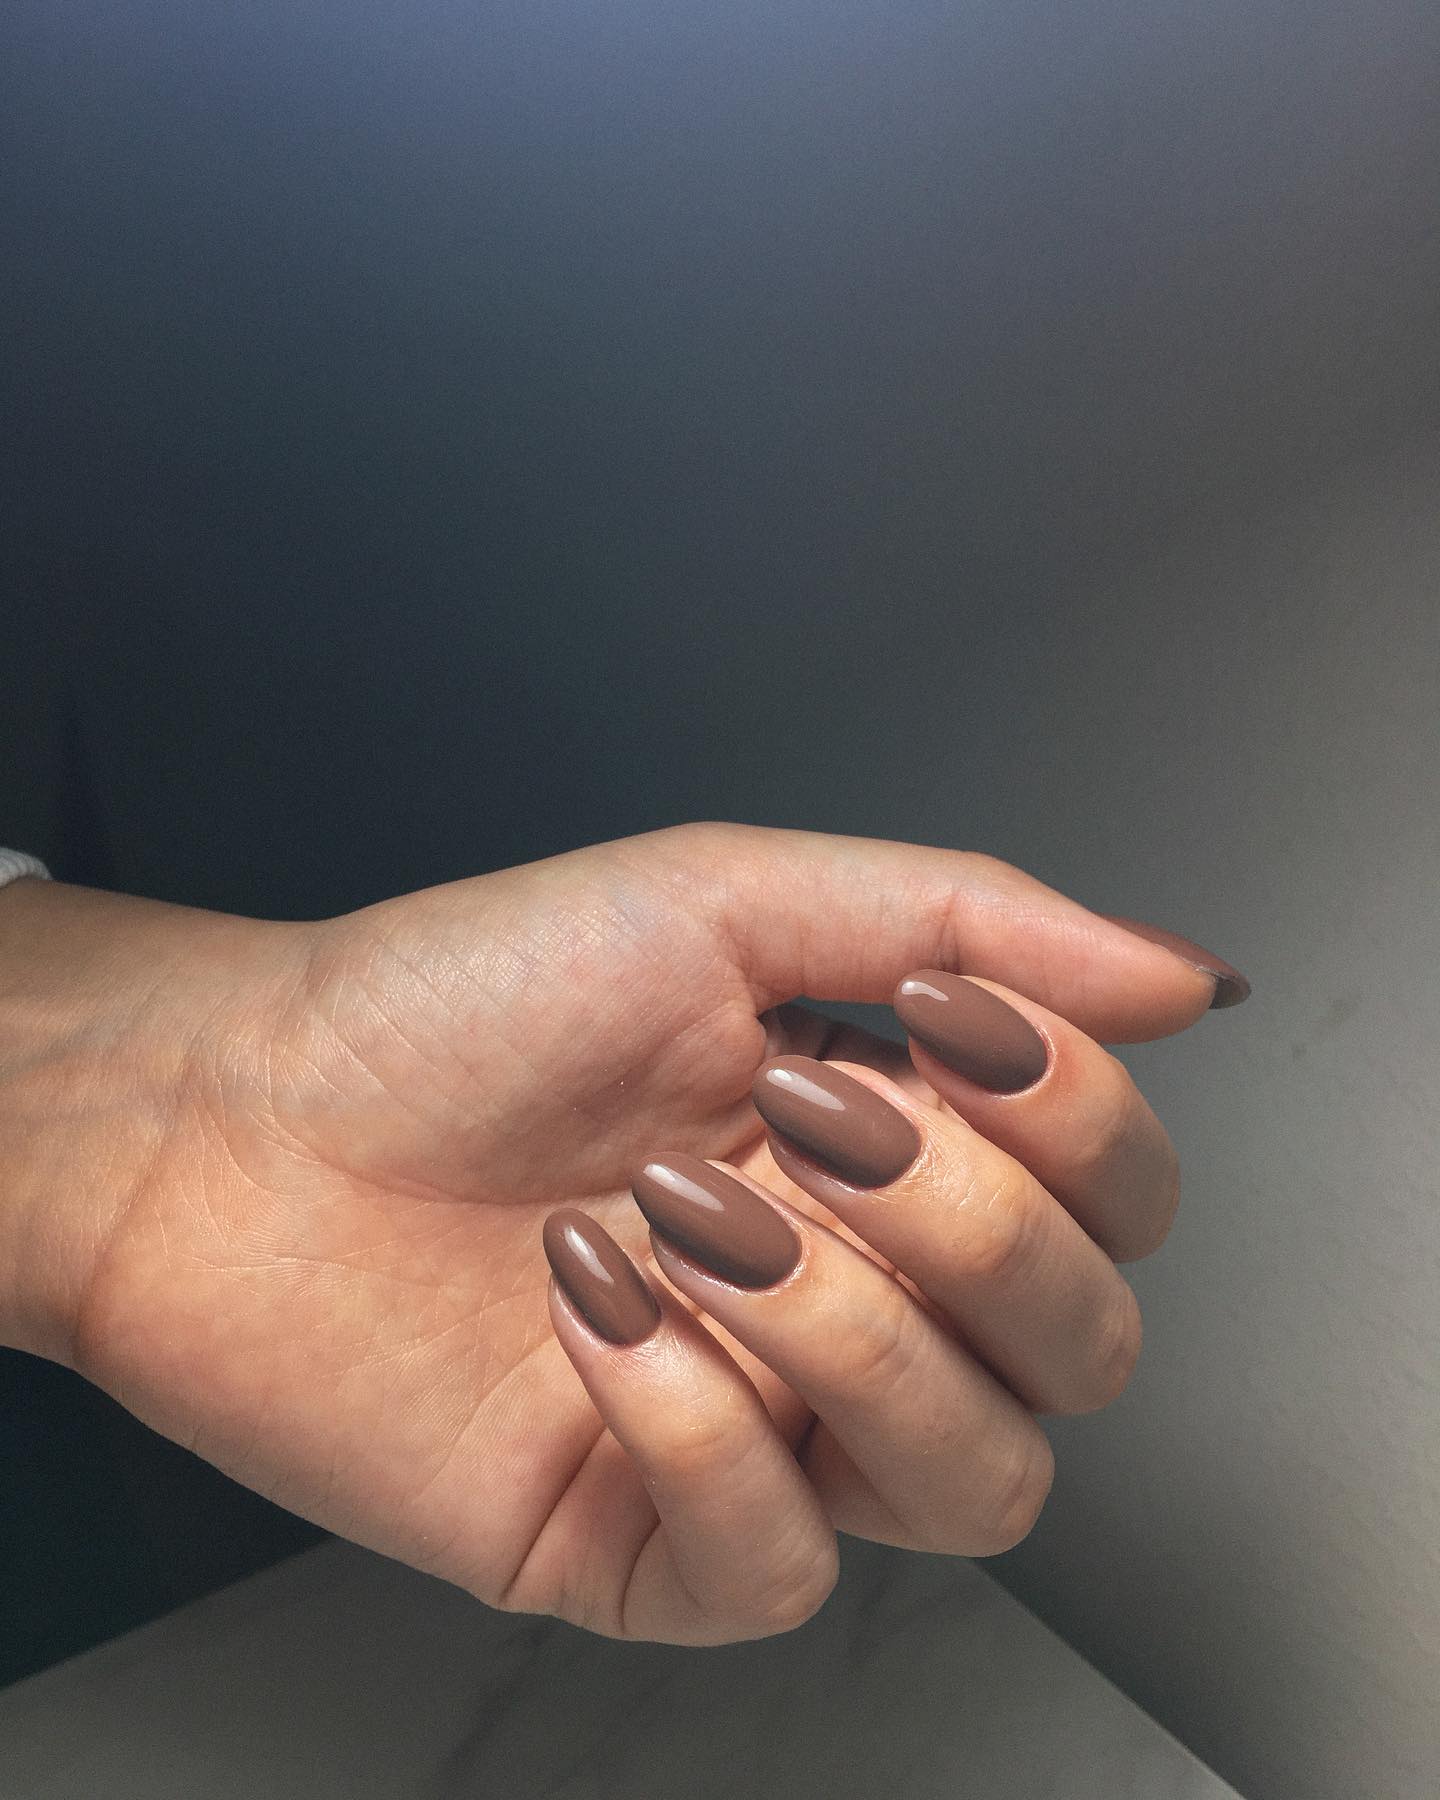
When one thinks of simple summer nails, a polished look with a matte finish often springs to mind. Exhibit photo is a testament to this: a sophisticated, taupe matte manicure that conveys a sense of modern elegance. What I adore about this look is how the short and neatly filed nails provide a perfect, unassuming canvas for the matte polish, allowing the texture to be the star of the show. It’s a design that whispers class and pairs beautifully with any summer ensemble.
Consumables needed:
- Base coat (For protection and adhesion)
- Taupe matte nail polish (Brand Recommendation: Sally Hansen Miracle Gel Matte in ‘Totem-ly Yours’)
- Matte top coat (To achieve the velvety finish)
- Nail file (For perfect shaping)
My professional tip here is to invest in a quality matte top coat that can transform any glossy polish into a matte masterpiece.
DIY Instructions:
- After prepping your nails, apply the base coat.
- Paint your nails with two coats of the taupe matte polish, allowing it to dry completely between coats.
- Seal the deal with a matte top coat for that sophisticated finish.
- Allow your nails to air dry. Matte polishes typically do not require a lamp to set.
This look is ideal for anyone craving simple summer nails short, where the maintenance is low but the impact is high.
Pink Glittery Glee
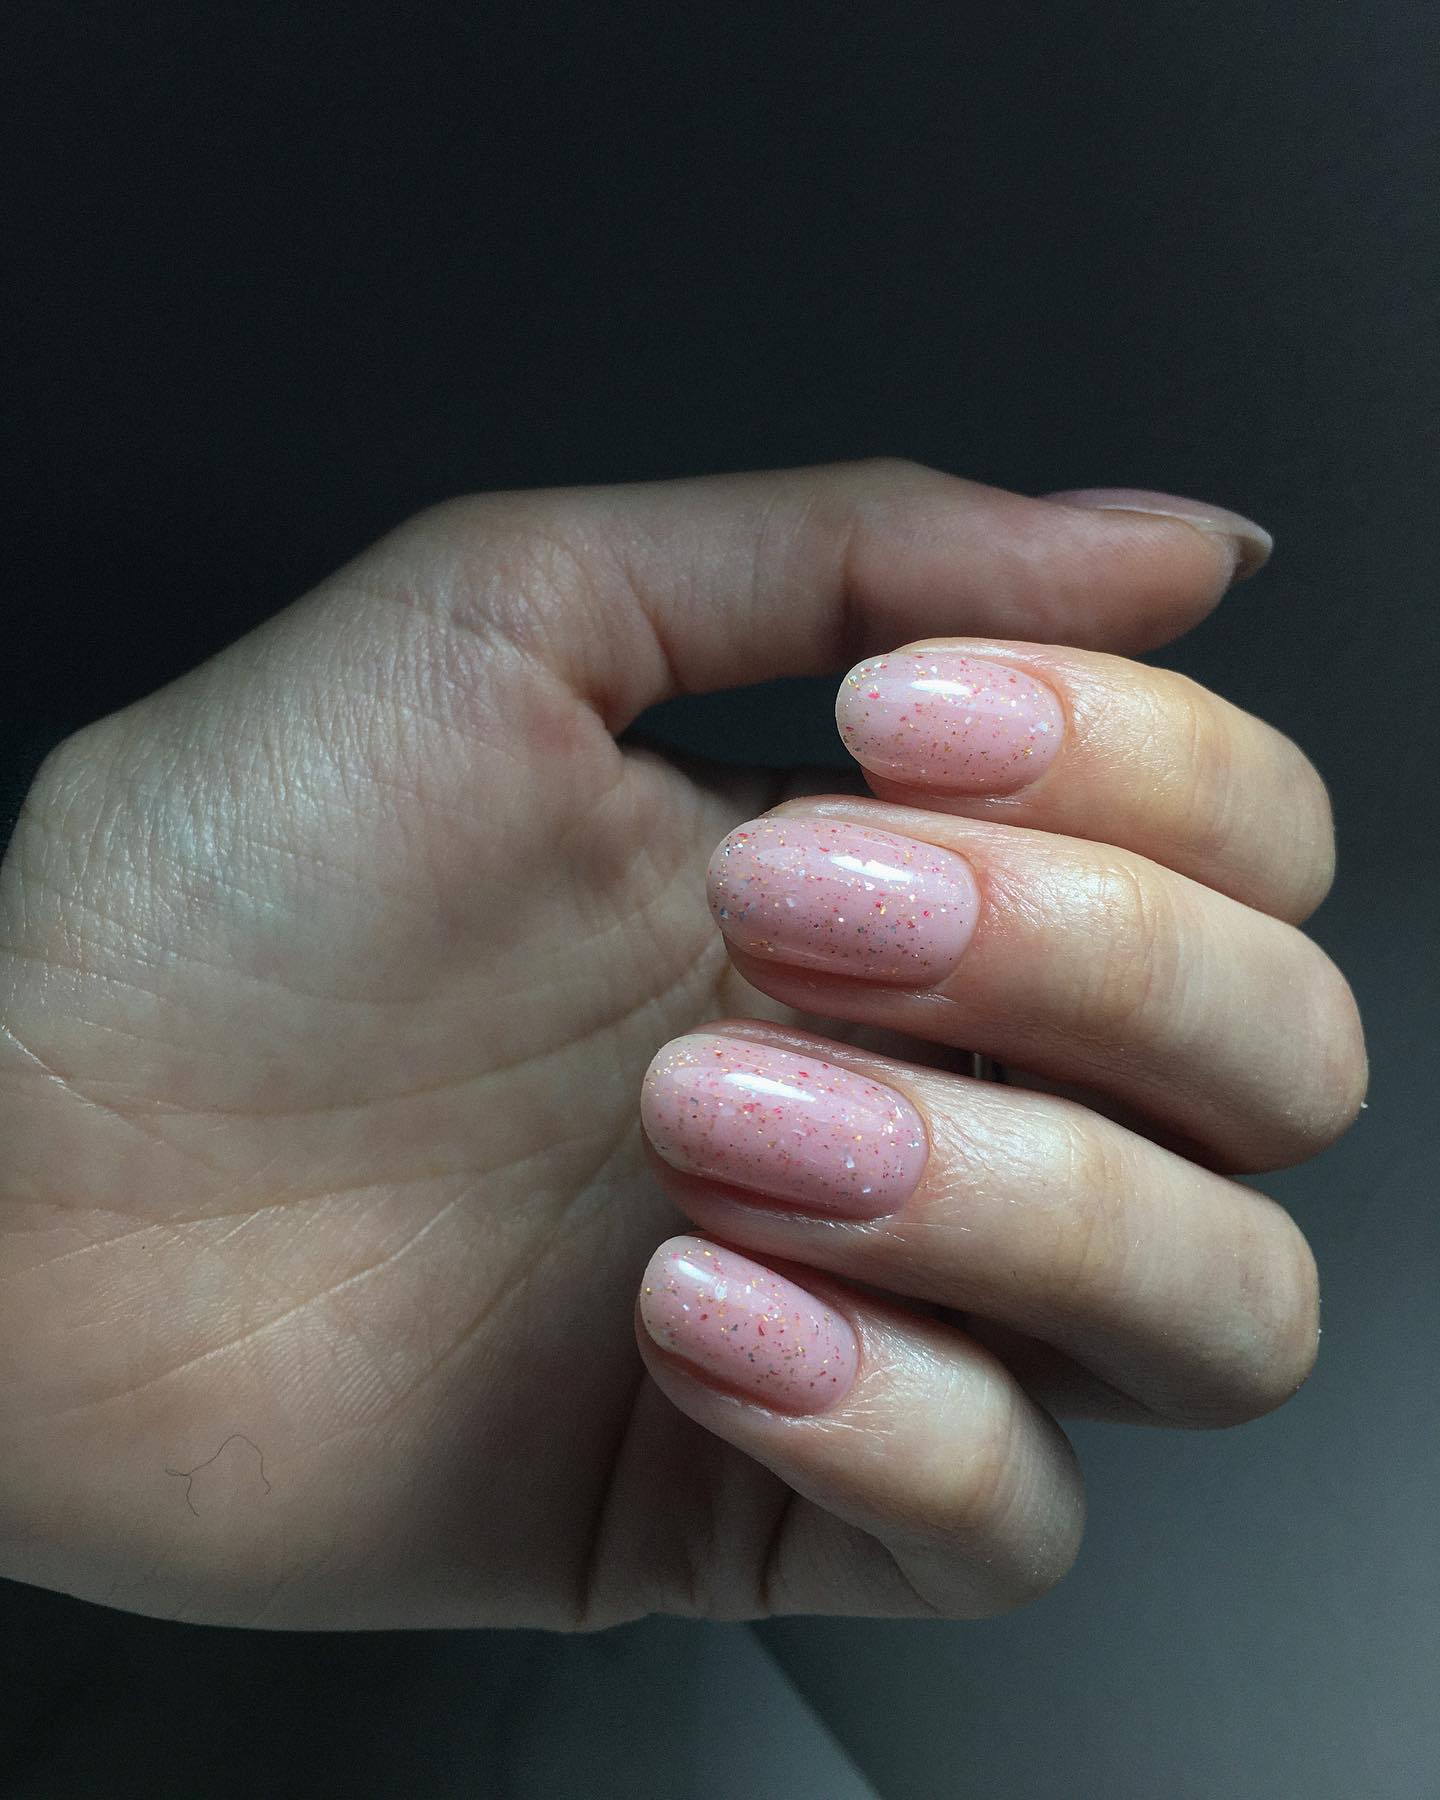
A celebration of simple summer nails pink, image encapsulates the joy of the season. The nails are short, painted with a sheer pink base and speckled with glitter, reminiscent of a sparkling pink lemonade on a sunny day. It’s a playful art piece that brings forth memories of summers past with a touch of glittery nostalgia.
Consumables needed:
- Base coat (For that initial layer of nail protection)
- Sheer pink polish with glitter (Brand Recommendation: China Glaze in ‘Fairy Dust’)
- Top coat (To secure the glitter in place)
- Quick-dry drops (For a swift manicure experience)
Adding glitter polish can sometimes be tricky, but with ‘Fairy Dust,’ the application is smooth, and the results are consistently delightful.
DIY Instructions:
- Apply a base coat to protect your nails.
- Apply two coats of the sheer pink glitter polish.
- Finish with a quick-dry top coat to protect your simple summer nails and to add a beautiful shine.
- If you’re in a rush, use quick-dry drops to speed up the drying process.
These simple summer nails short gel are fun, flirty, and a breeze to recreate, making them an ideal choice for a summer soirée.
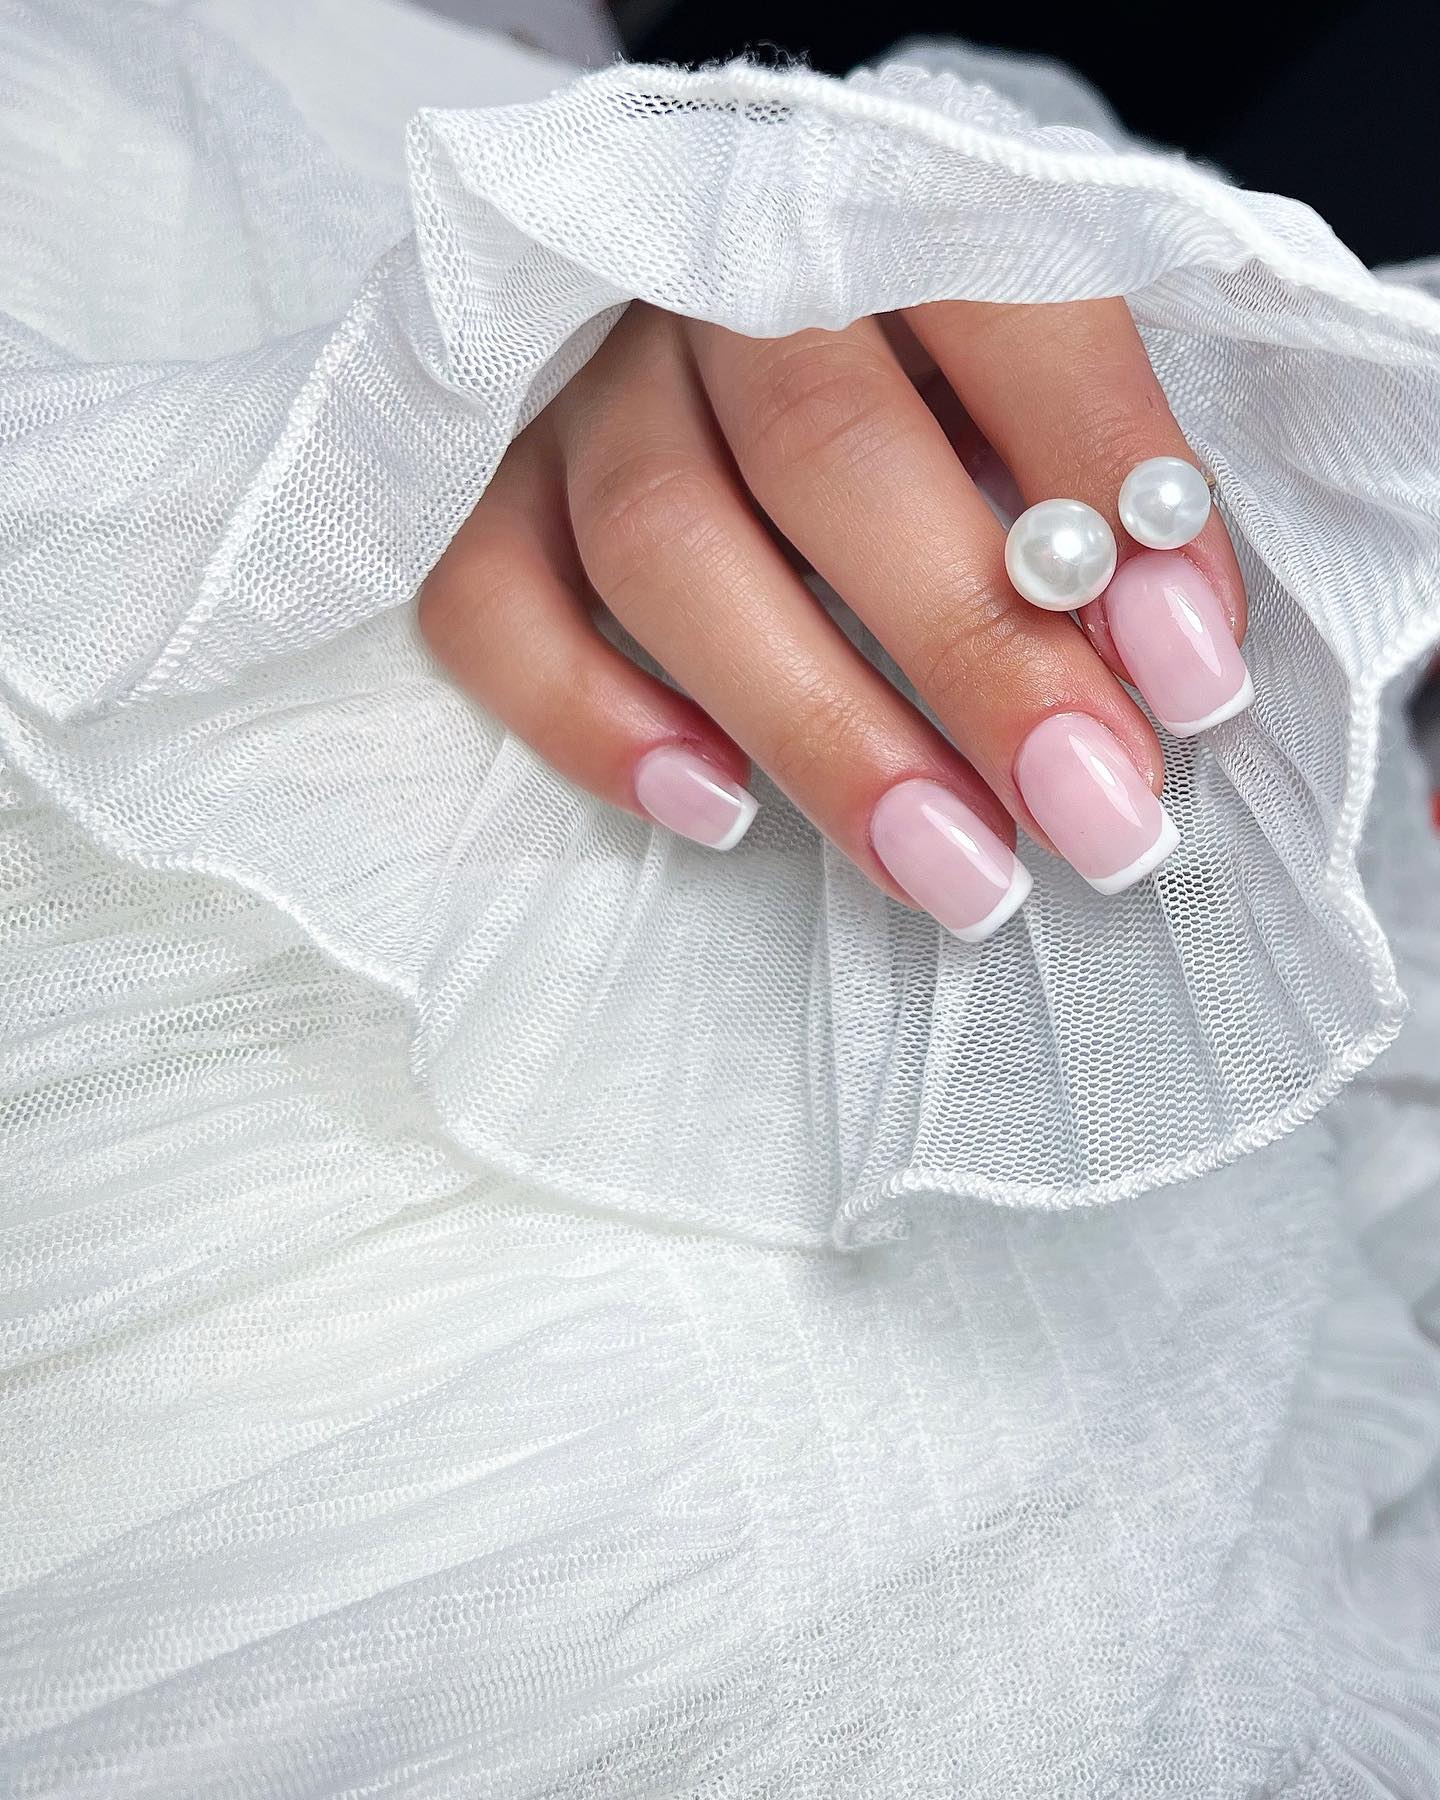
Gold-Tipped Sophistication
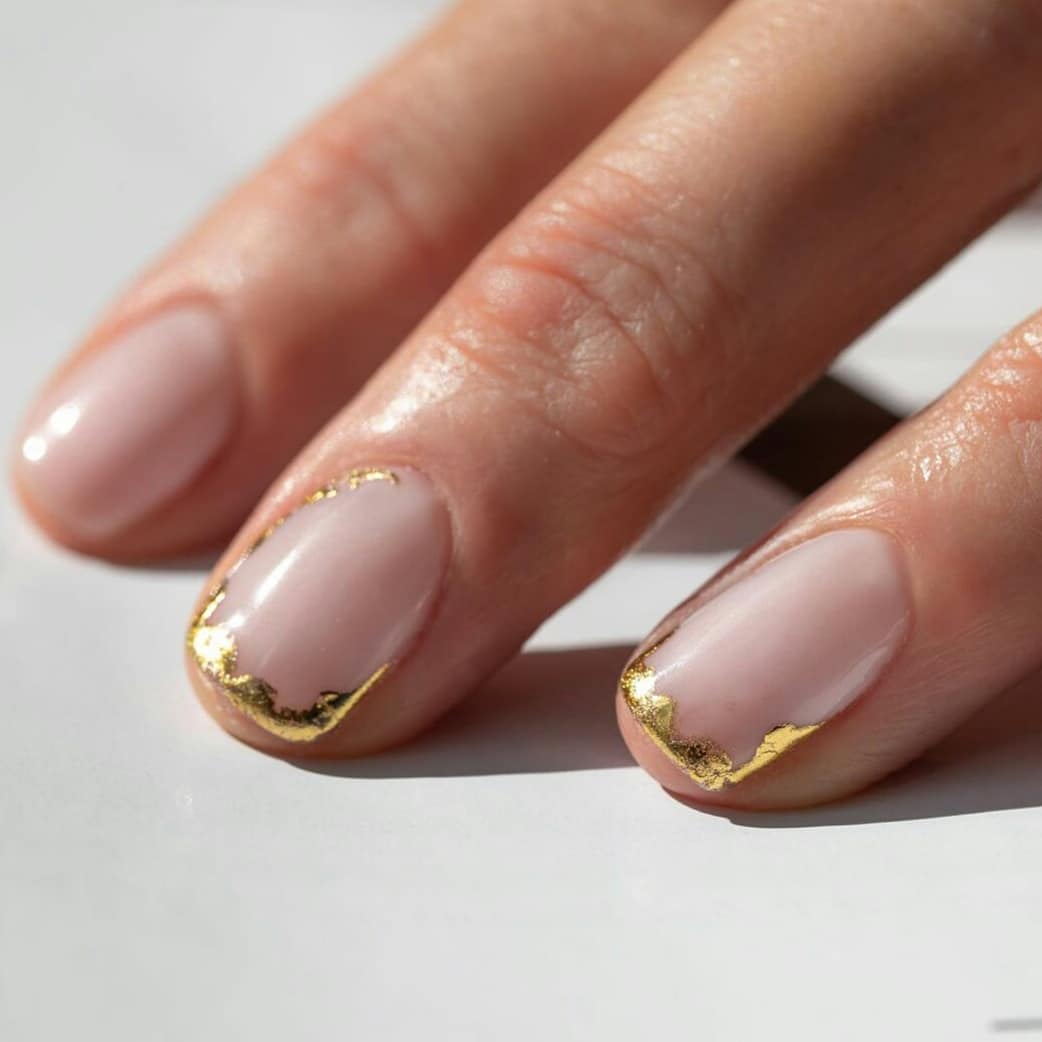
The allure of simple summer nails takes a luxurious turn in photo. Here, we see short nails that have been transformed into a canvas for pure opulence. The nude polish, synonymous with subtlety, is crowned with a free-hand painted gold leaf tip, a stroke of genius that borders on modern art. It’s a simple summer nails french tip with a twist that speaks to those who favor a dash of glamour in their simplicity.
Consumables needed:
- Base coat (For a perfect adhesion)
- Nude polish (Brand Recommendation: Zoya in ‘Chantal’)
- Gold leaf polish (Brand Recommendation: OPI in ‘Love.Angel.Music.Baby’)
- Top coat (To ensure lasting shine and wear)
- Fine-tip brush (For detailing)
Each product plays its part to give you a look that is as durable as it is striking, ideal for those simple summer nails short lovers who want to make a statement.
DIY Instructions:
- Prep your nails and apply a base coat.
- Paint on two coats of the nude polish, letting each coat dry thoroughly.
- Use a fine-tip brush to apply the gold leaf polish on the tips. It doesn’t have to be perfect—the beauty is in the imperfection.
- Seal your design with a top coat for longevity.
This design is a celebration of summer’s laid-back luxury, perfect for evenings out or a day at the office.
Sunny Side Up
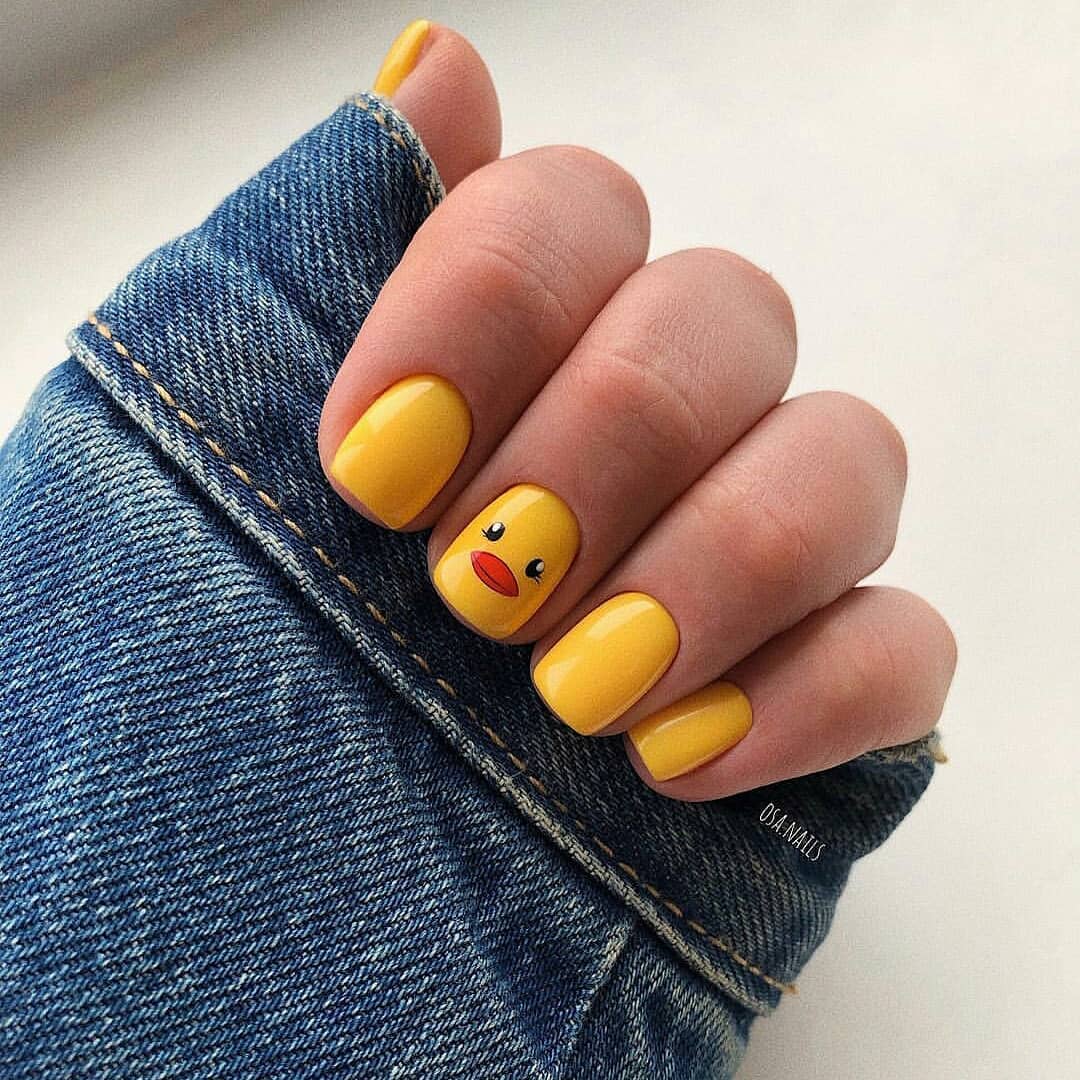
In photo the mood is undeniably cheerful, as we bask in the warmth of simple summer nails yellow. These short nails are bathed in a sunny yellow polish, a color that’s like a slice of summer on your fingertips. What elevates this look into the territory of art is the playful, duck-faced emoji on the ring finger—a nod to the carefree spirit of the season. It’s a manicure that says ‘fun in the sun’ with a wink.
Consumables needed:
- Base coat (A must for nail protection)
- Vibrant yellow polish (Brand Recommendation: Essie in ‘Aim to Misbehave’)
- Black and orange nail art pens (For the emoji detail)
- Top coat (For a glossy, long-lasting finish)
Opt for a yellow that’s bright and full of pigment for that true summer vibe.
DIY Instructions:
- Prep the nail surface and apply a base coat.
- Paint the nails with the yellow polish—two coats should do the trick.
- With the nail art pens, draw the emoji on the ring finger nail—practice makes perfect!
- Apply a top coat to seal and protect your playful simple summer nails art.
This is the perfect pick for a summer barbecue or beach day—effortless yet attention-grabbing.
Eclectic Chic
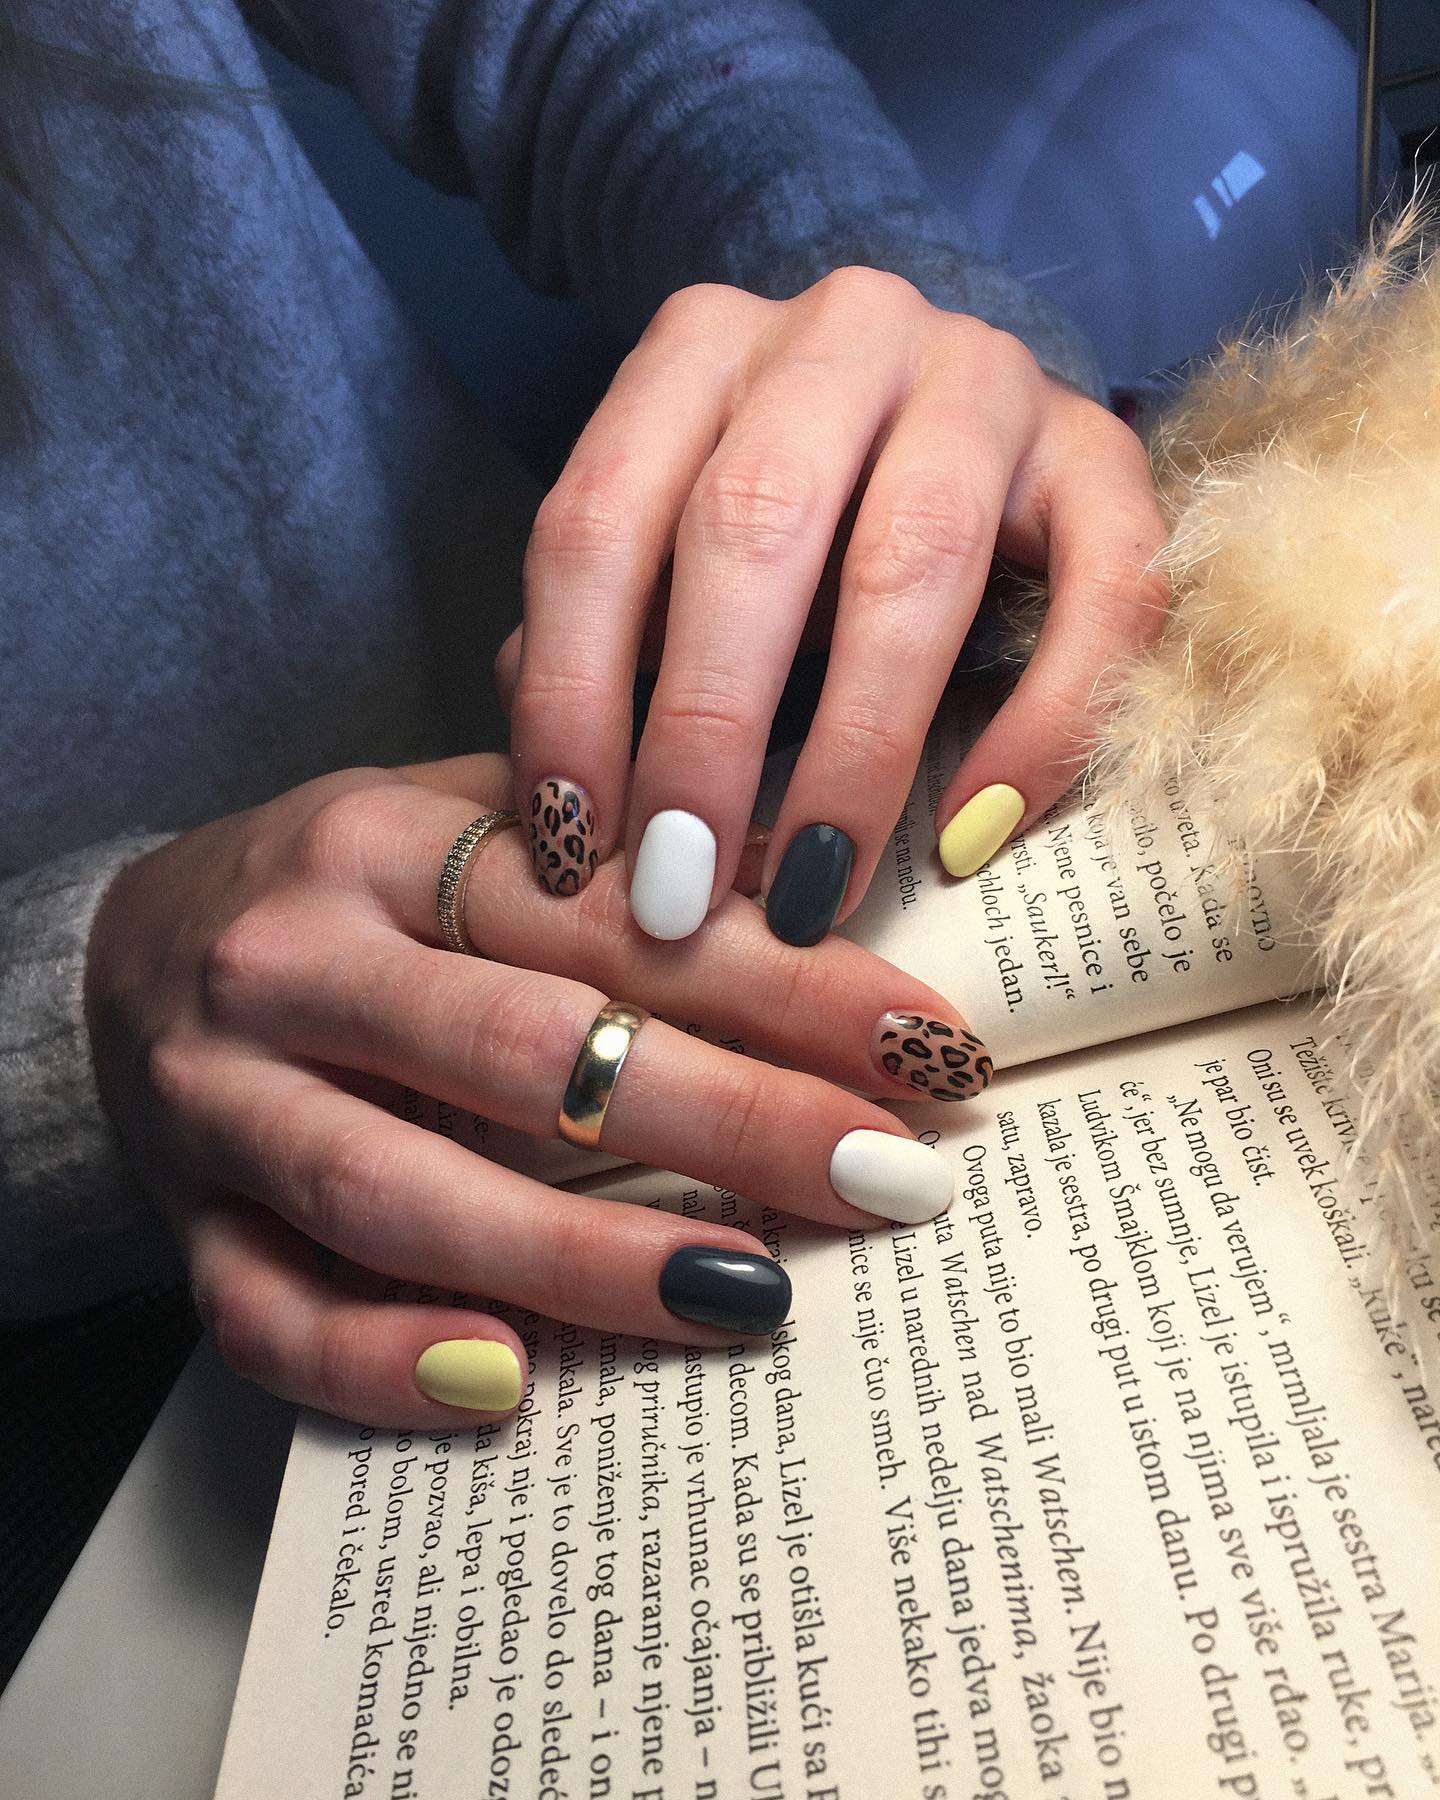
As a professional manicurist, I find the mixed-media approach in photo to be particularly captivating. We’re treated to a tableau of simple summer nails designs—from the timeless elegance of matte white to the adventurous streak of leopard print and the bold statement of dark blue. It’s an eclectic mix that works surprisingly well together, each nail telling its own story. The matte yellow brings a touch of summer brightness, while the leopard print whispers a wild, untamed narrative.
Consumables needed:
- Base coat (To start off strong)
- A variety of polishes: matte white, dark blue, and matte yellow (Brand Recommendation: CND Vinylux in ‘Cream Puff’, ‘Midnight Swim’, and ‘Sun Bleached’)
- Leopard print stencil or nail art pen (For the detail work)
- Matte top coat (To unify the textures)
A true testament to the saying ‘variety is the spice of life,’ these simple summer nails acrylic are for the daring fashionista.
DIY Instructions:
- Prep nails, apply base coat.
- Apply two coats of each polish to its designated nail.
- For the leopard print, use a stencil or free-hand with a nail art pen.
- Apply a matte top coat to all nails for a cohesive look.
Artistic Expression
In photo, we find a playful expression of simple summer nails blue and simple summer nails white, a combination that evokes images of clear skies and fluffy clouds. The addition of abstract green and white patterns on two nails adds a modern artistry to the mix, like wearing a piece of a contemporary gallery. The light blue is serene, the white is crisp, and the artwork is thought-provoking—an ideal conversation starter at any summer outing.
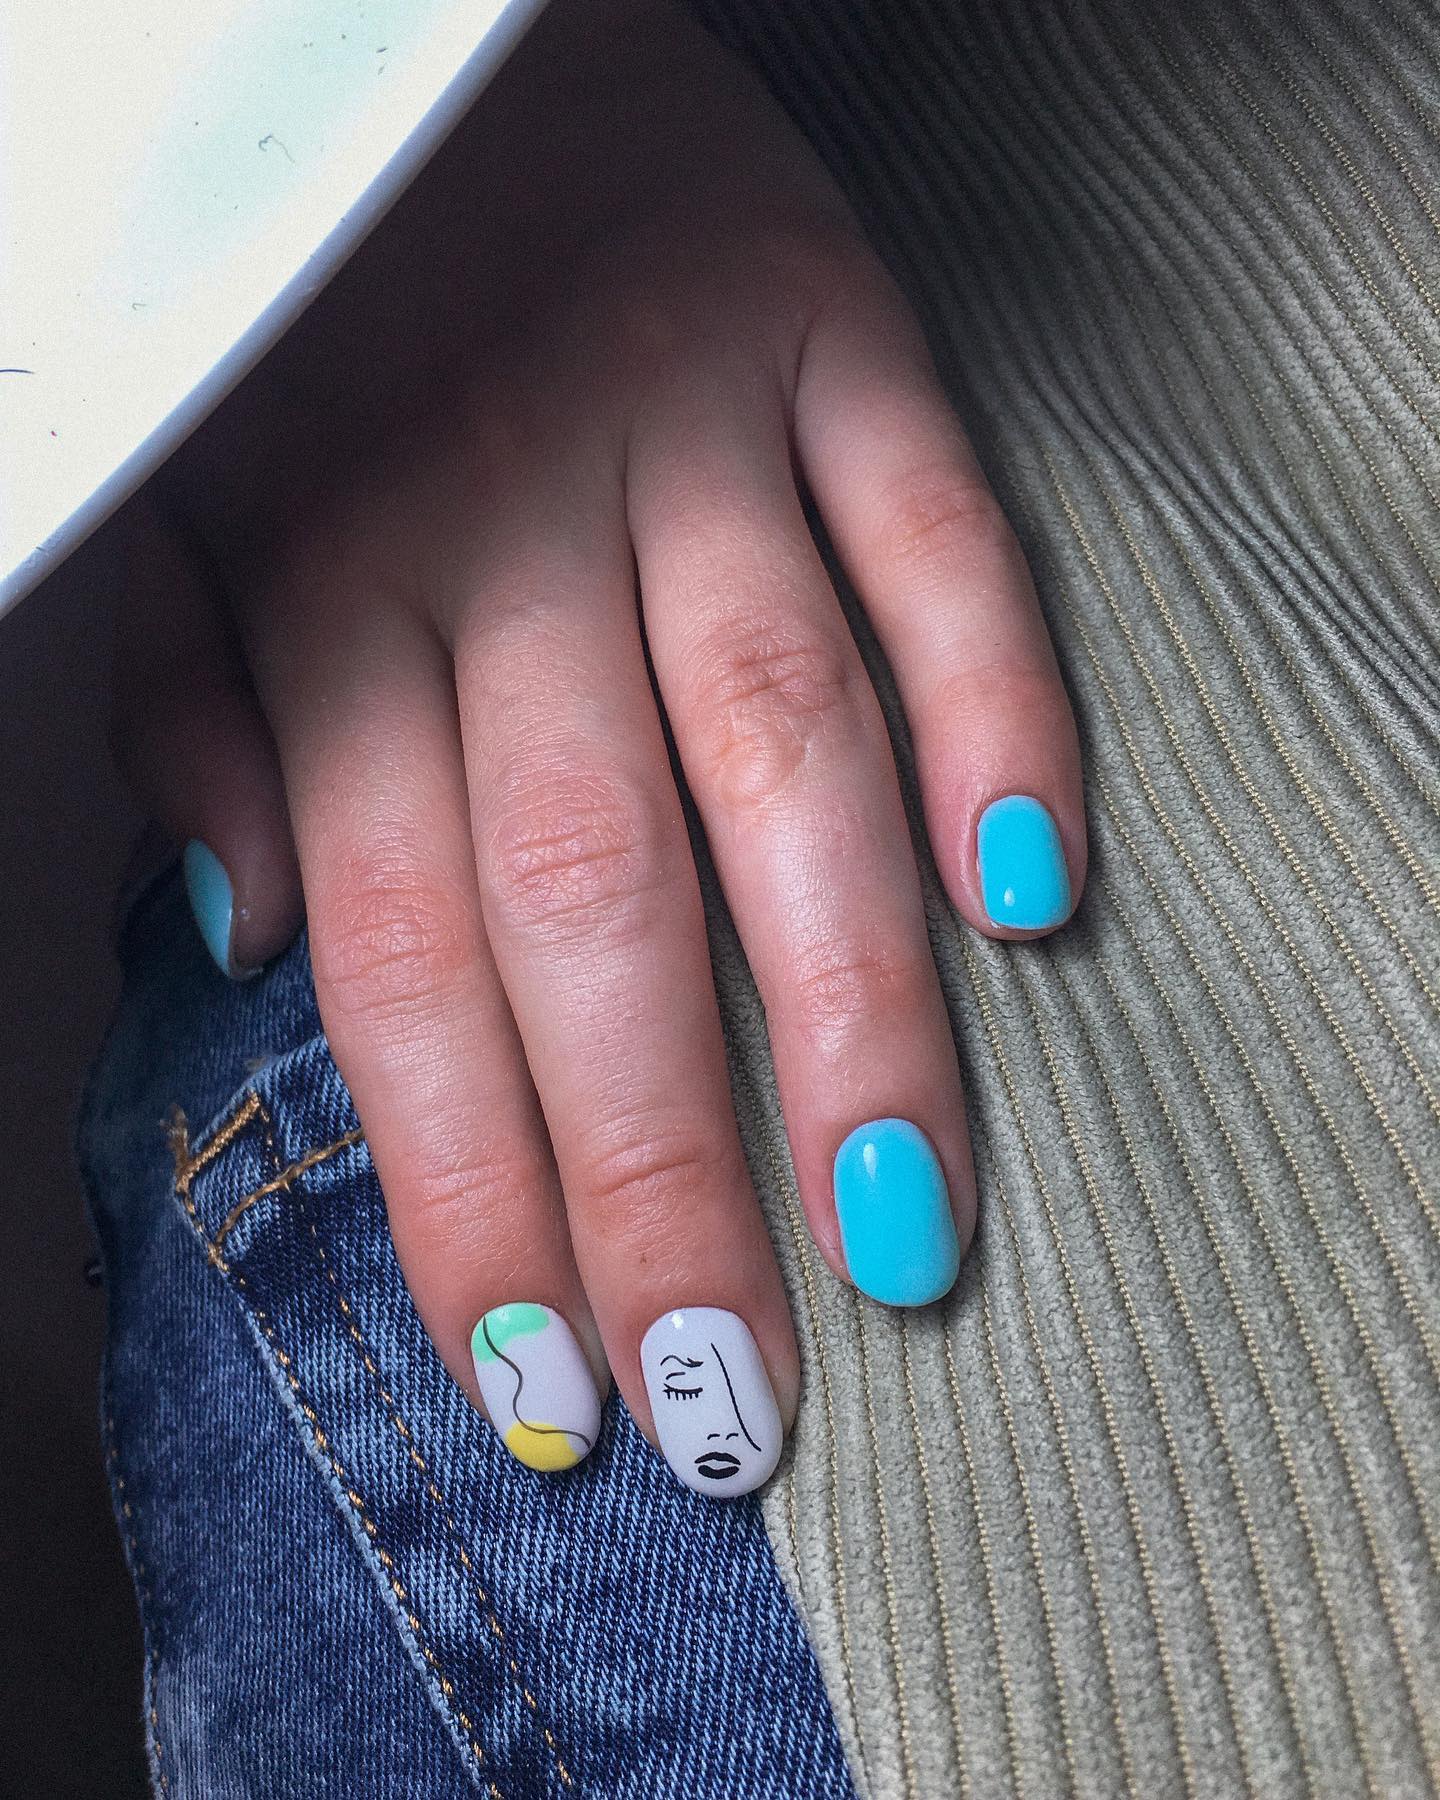
Recommendation: OPI in ‘Can’t Find My Czechbook’)
- White polish for the base of art nails (Brand Recommendation: Sally Hansen Insta-Dri in ‘White On Time’)
- Green polish for abstract details (Brand Recommendation: China Glaze in ‘Def Defying’)
- Detailing brush (For the intricate design)
- Top coat (For a high-gloss finish that will endure the summer adventures)
This simple summer nails art calls for a steady hand and a touch of creativity. Don’t be afraid to let your inner artist out; the abstract design need not be perfect, as its charm lies in its individuality.
DIY Instructions:
- Apply your base coat to protect your natural nails.
- Sweep on the light blue polish on all but two nails, and use the white polish as the base on the remaining two.
- Once dry, use a fine detailing brush to create green abstract patterns on the white base.
- Apply the white polish on the blue nails for additional abstract designs if desired.
- Finish with a glossy top coat for protection and shine, ensuring your simple summer nails stay beautiful.
Floral Whimsy
The image file unveils a delicate dance of simple summer nails short with a floral narrative that feels like a gentle whisper of a summer breeze on a warm afternoon. These nails boast a short and natural shape, coated in a sheer pink that gives the impression of health and vibrancy. Adorning this subtle background, we find hand-painted blooms and greenery that capture the spontaneous beauty of wildflowers. Each nail tells a different chapter of the same story—of petals and leaves unfurling under the sun.
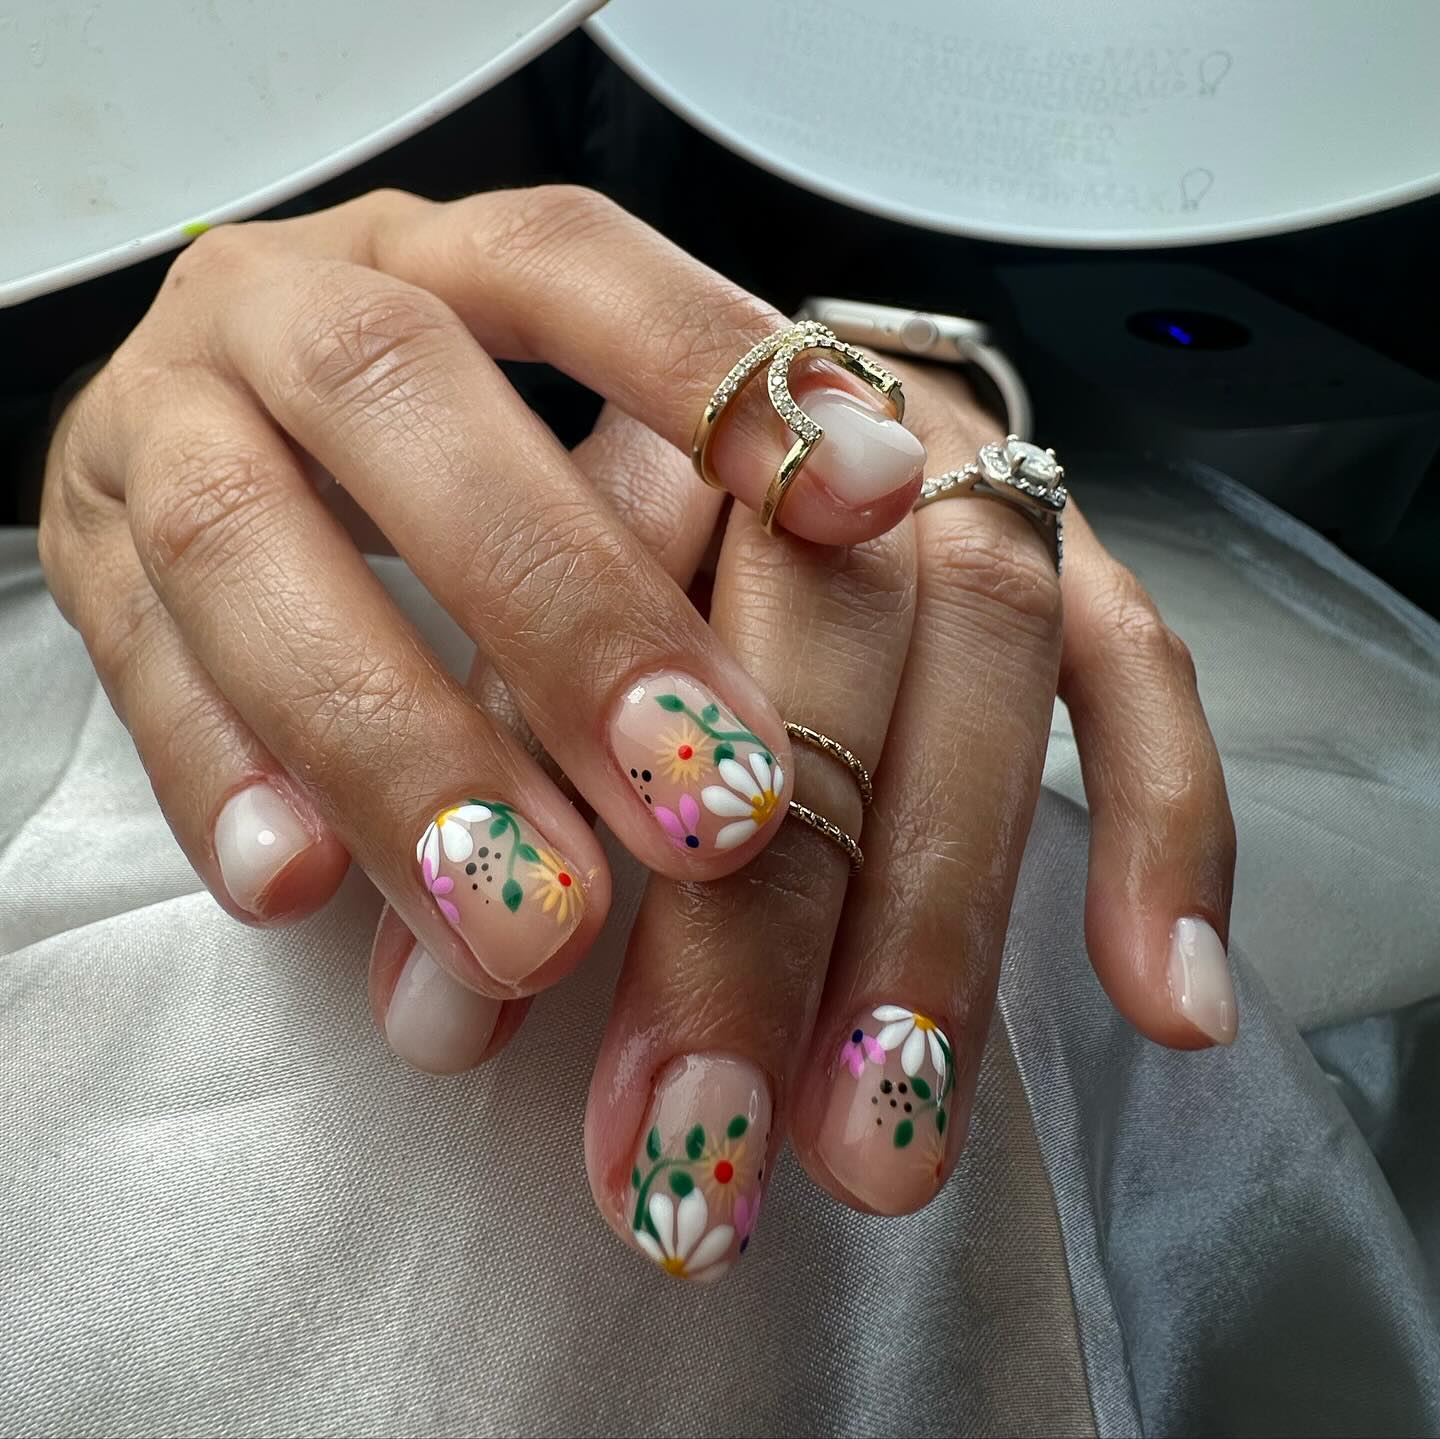
Consumables needed:
- Base coat (A nourishing foundation for natural nails)
- Sheer pink polish (Brand Recommendation: Essie in ‘Ballet Slippers’)
- A palette of nail art polishes for the flowers (Pinks, whites, greens)
- Fine detailing brush (For the intricate petal and leaf designs)
- Top coat (To encapsulate the florals in a glossy finish)
Embrace the artistry within and bring this garden fantasy to life with a steady hand and a dash of creativity.
DIY Instructions:
- Apply your base coat for a healthy nail start.
- Lay down two coats of the sheer pink polish for a natural blush to the nails.
- With your detailing brush, gently craft the floral designs on each nail, allowing your creativity to flow.
- Protect your artful endeavor with a swipe of a high-gloss top coat for longevity.
This manicure is a celebration of the delicate art of florals, perfect for those sunny days spent picnicking in the park or strolling through weekend markets.
Lush Greenery
File image showcases the boldness of a lush, simple summer nails green hue that conjures images of dense foliage and adventurous explorations into the heart of the jungle. The sleek, short and impeccably shaped nails are lacquered in a vibrant green that demands attention yet retains an air of sophistication. On one nail, a solitary white fern is etched, serving as a stark, beautiful contrast—a nod to nature’s own artistry.
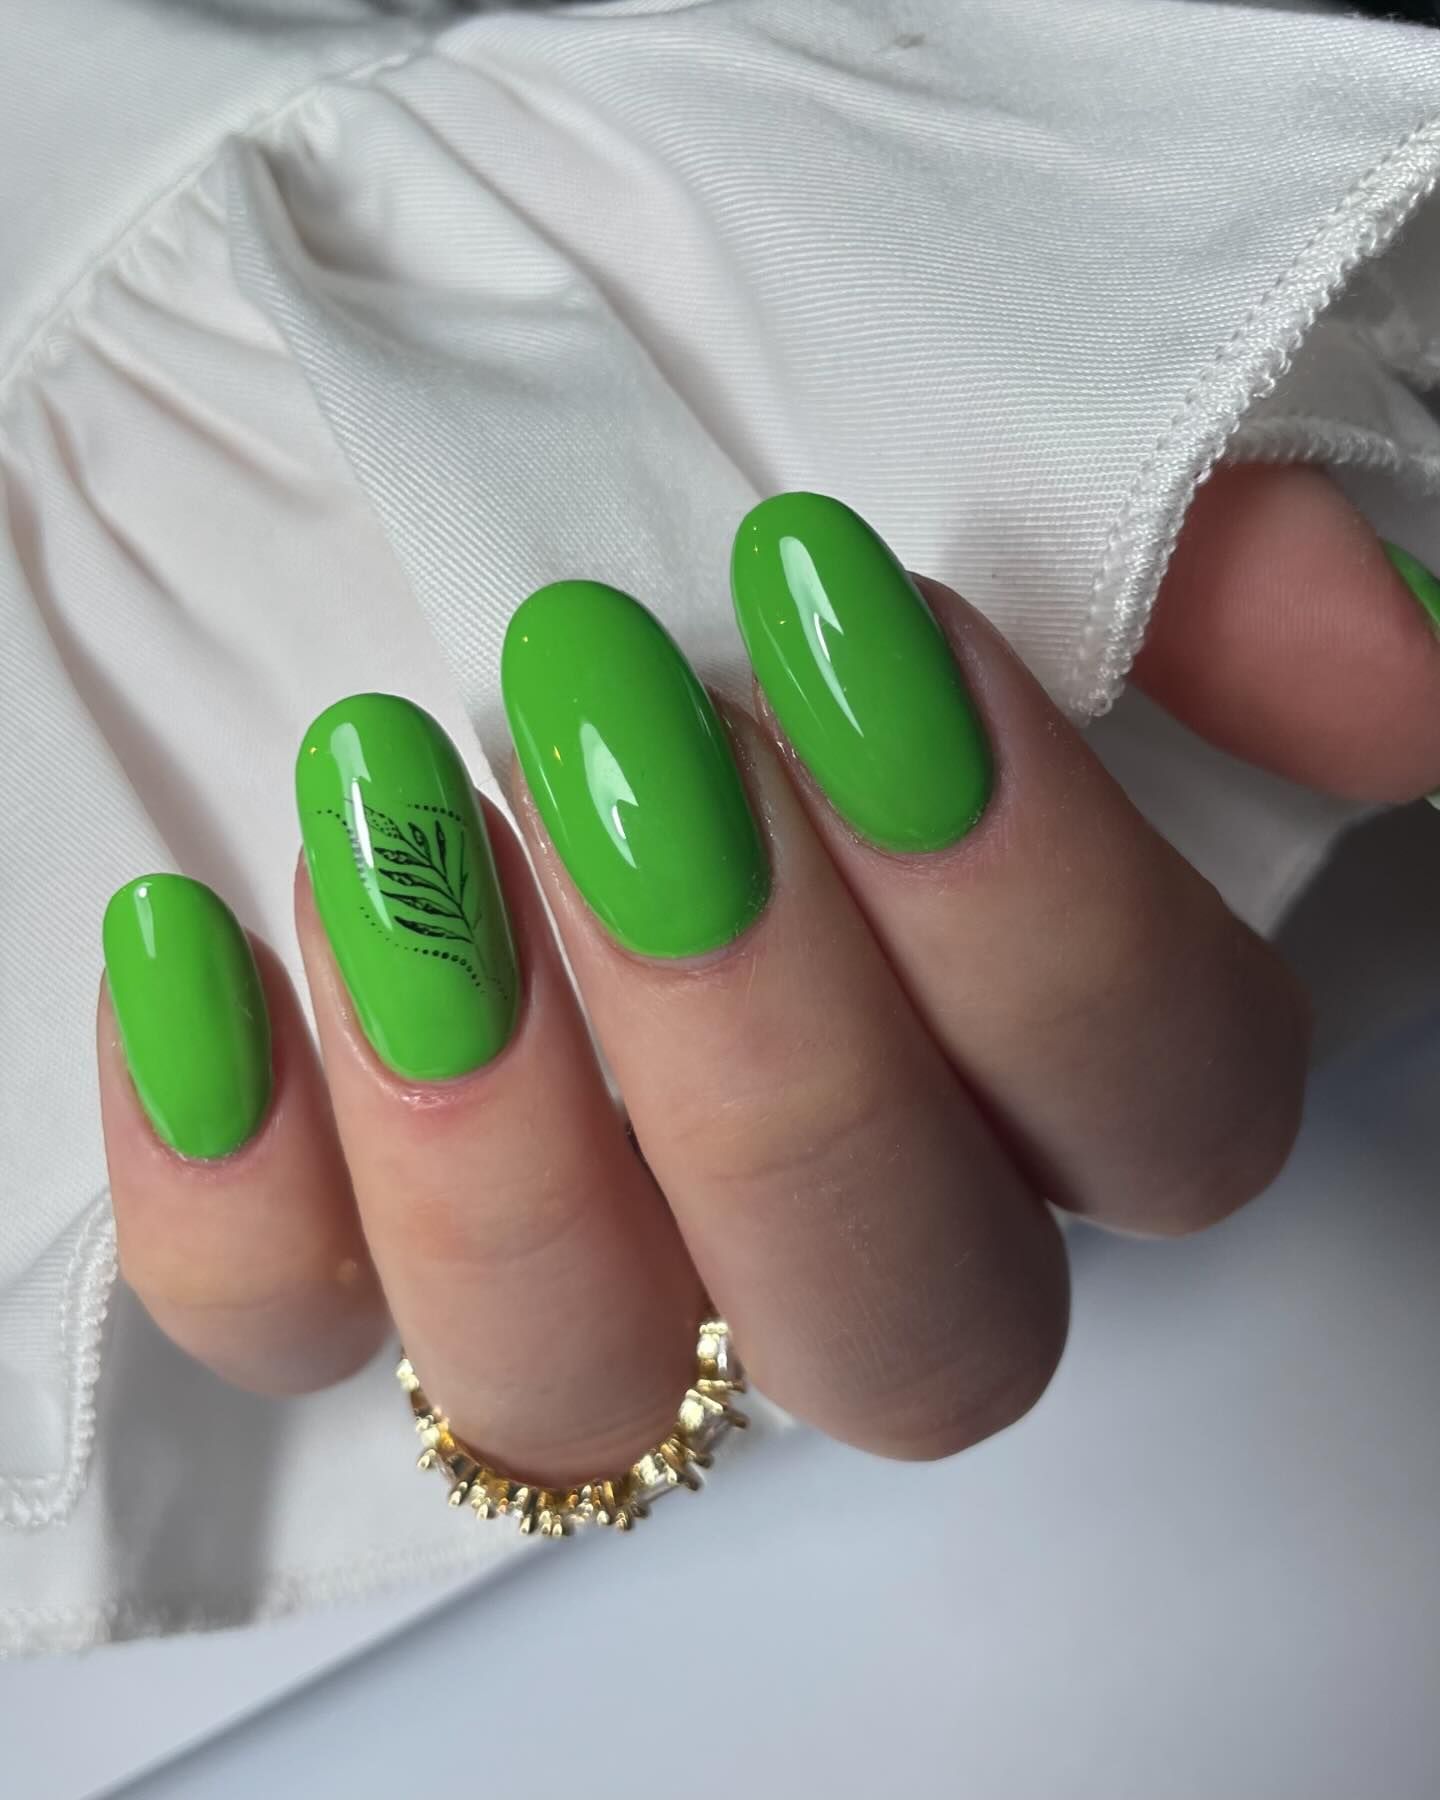
Consumables needed:
- Base coat (To prep and protect)
- Vibrant green polish (Brand Recommendation: OPI in ‘Green-wich Village’)
- White nail art pen (For the fern design)
- Top coat (For a protective, high-shine finish)
This is the quintessential statement piece for those unafraid to wear their love for nature on their very fingertips.
DIY Instructions:
- Start with a base coat to ensure a smooth canvas.
- Apply two coats of the vibrant green polish, letting it set between applications.
- With a white nail art pen, draw the fern design on the accent nail.
- Seal everything with a top coat for a dazzling and enduring finish.
Ideal for the bold spirit, this design is sure to be a conversation starter at any summer soiree or outdoor festivity.
Golden Sands
In photo we are greeted with simple summer nails short that echo the hues of golden sands shimmering under the summer sun. These nails possess a short, refined shape that is both practical and elegant. A neutral base color is kissed with a gradient of gold glitter, creating an ombre effect reminiscent of a desert mirage or a beach at sunset.
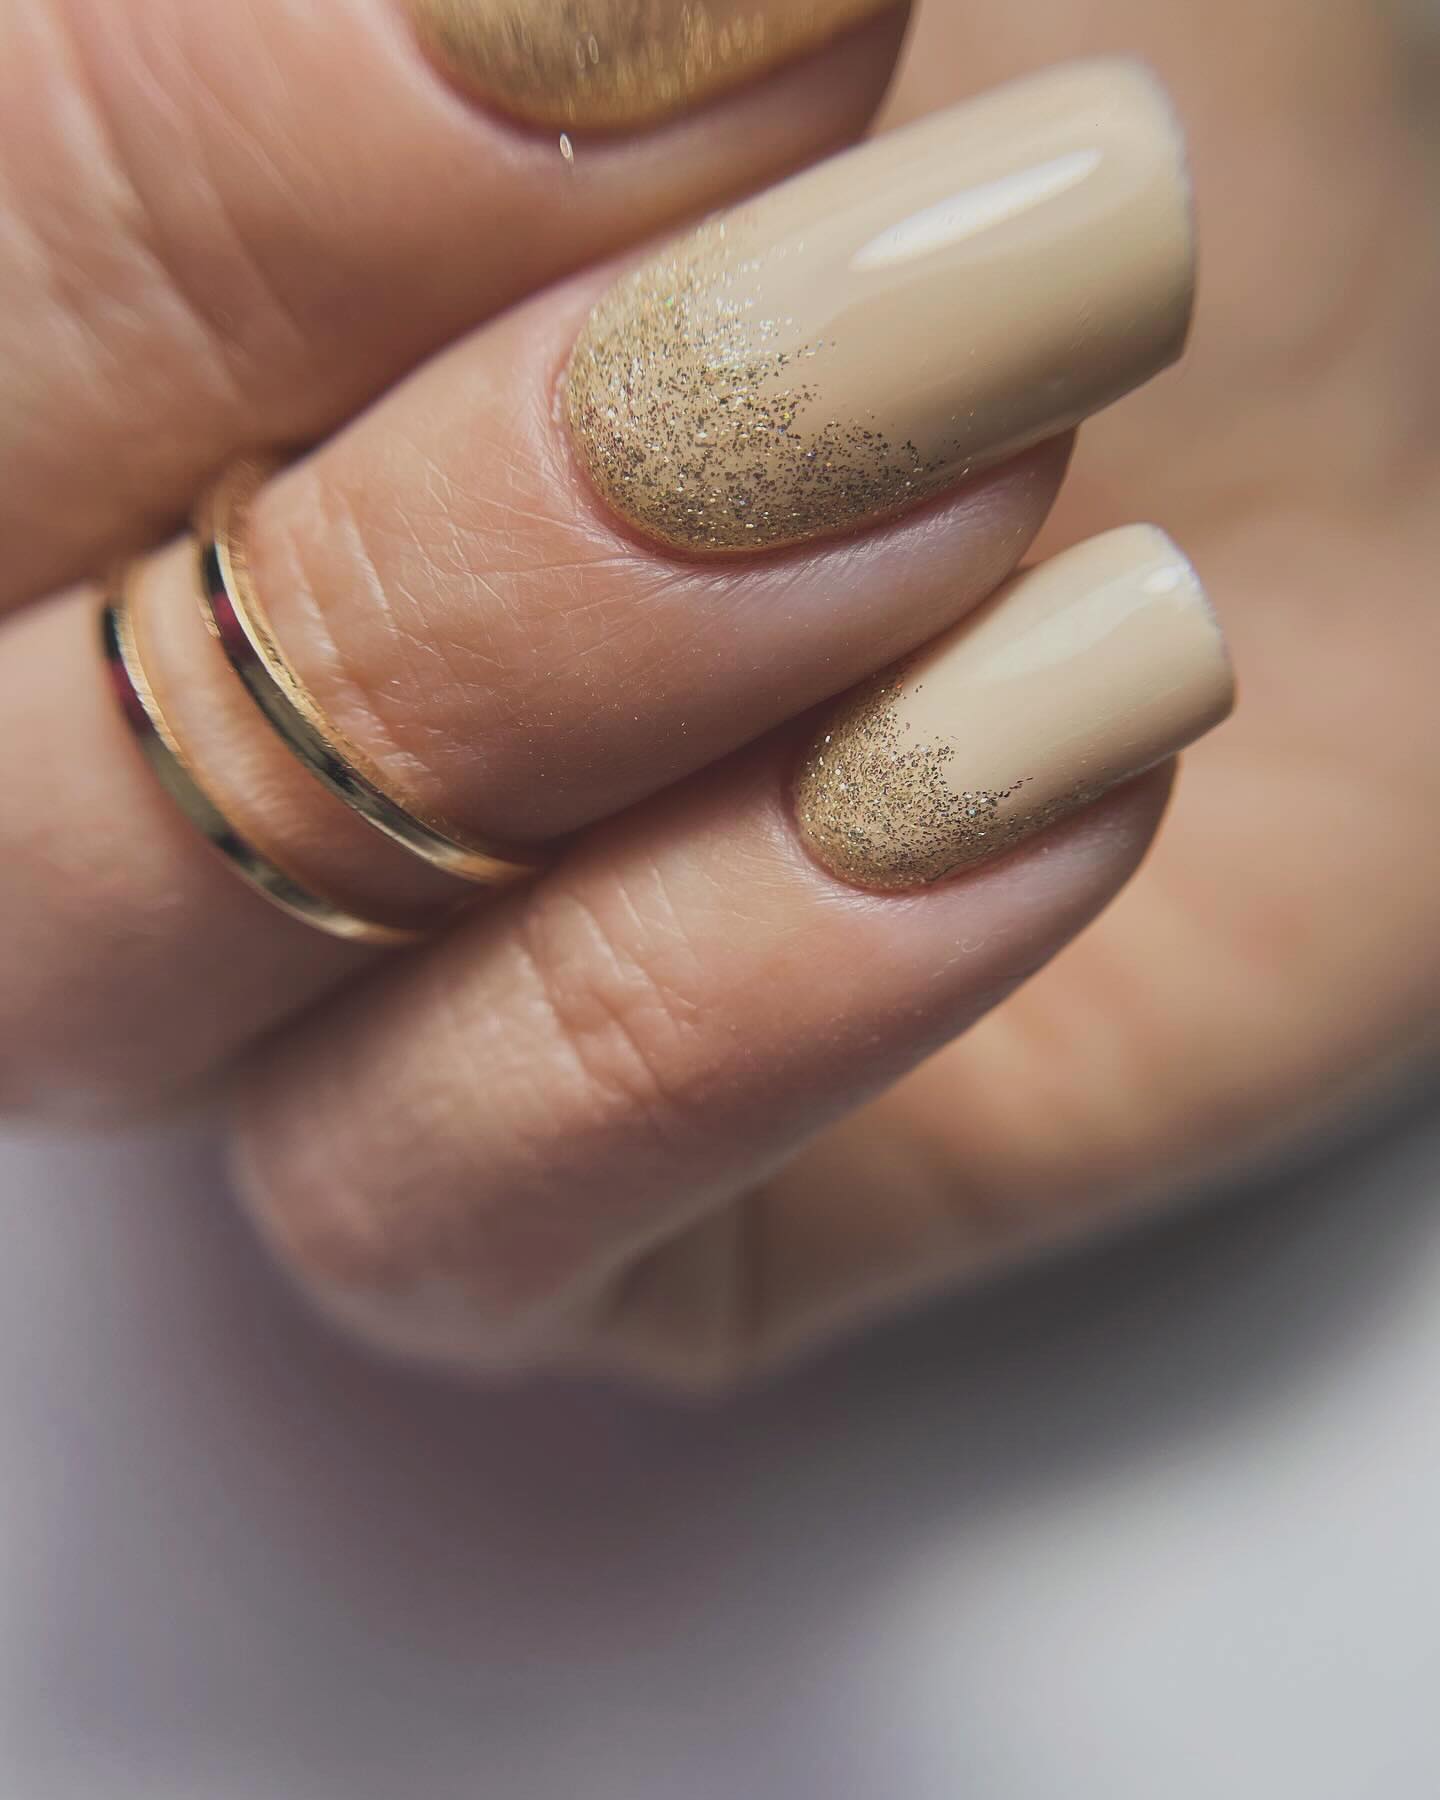
Consumables needed:
- Base coat (For long-lasting wear)
- Neutral polish (Brand Recommendation: Essie in ‘Sand Tropez’)
- Gold glitter polish (Brand Recommendation: China Glaze in ‘I’m Not Lion’)
- Sponge (For the ombre effect)
- Top coat (To lock in the design and add shine)
The result is an enchanting blend that transitions effortlessly from day to evening.
DIY Instructions:
- Apply a base coat to protect your nails.
- Paint a neutral base color, letting it dry completely.
- Dab the sponge into the gold glitter polish and lightly press it onto the tips of your nails, gradually fading into the base color.
- Finish with a top coat for a seamless blend and enduring sparkle.
This manicure is for those who seek the treasure of understated luxury, perfect for a summer evening of elegance and intimacy.
Minimalist Hearts
File whispers the charm of simple summer nails short through a minimalist lens. The beauty of these nails lies in their sheer simplicity—a soft, opaque base adorned with nothing but a single, tiny heart on each nail. It’s an ode to the lovers of minimalism, to those who find profound beauty in a single gesture, a single symbol.
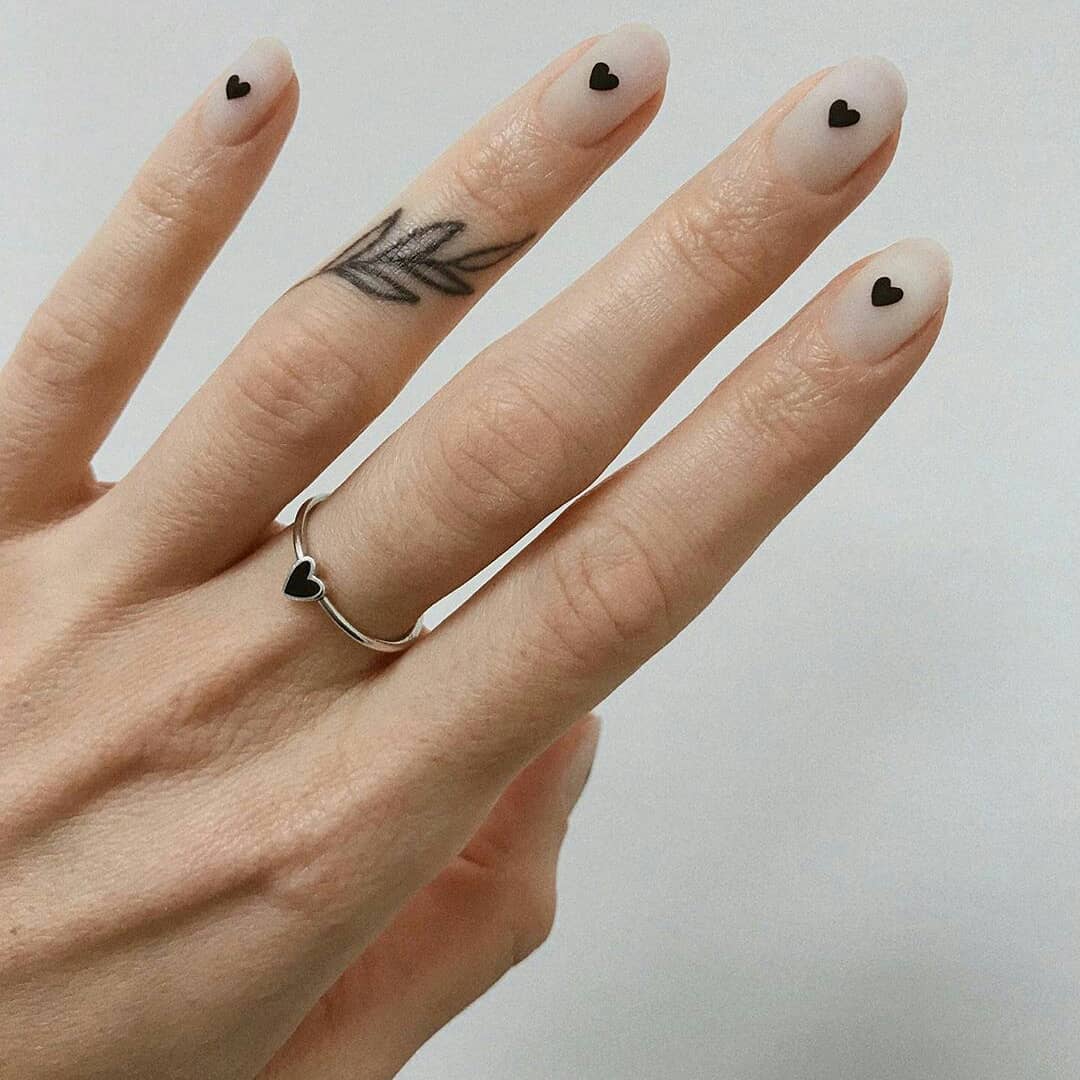
Consumables needed:
- Base coat (For a flawless beginning)
- Opaque nude polish (Brand Recommendation: OPI in ‘Samoan Sand’)
- Black nail art pen (For the delicate hearts)
- Top coat (For a smooth, protective finish)
This design captures the essence of summer romance with just a hint of playfulness, ideal for those who embrace the ‘less is more’ philosophy.
DIY Instructions:
- Start by applying the base coat to ensure a smooth application.
- Paint your nails with the opaque nude polish. Two coats should give you a beautiful, even color.
- Once dry, use the black nail art pen to carefully draw a small heart on each nail. If you’re not confident in your free-hand skills, you can use a stencil or a dotting tool for more precision.
- Apply a top coat to seal the design and add longevity to your manicure.
These simple summer nails short are a nod to the minimalist’s soul, perfect for any summer day whether you’re at work or out for a casual coffee.
Geometric Grace
The photo file is a display of simple summer nails short yet sophisticated, embracing geometric patterns that speak to the modernist in all of us. The nails are kept short, practical for the summer hustle, and are painted in a neutral shade that flatters every skin tone. Over this base, black lines intersect to create an illusion of woven threads, a design that merges the traditional with the contemporary seamlessly.

Consumables needed:
- Base coat (A solid foundation for durability)
- Neutral base polish (Brand Recommendation: Essie’s ‘Tuck it in My Tux’)
- Black nail art pen or striper (For precise lines)
- Top coat (To seal the design and add a glossy finish)
DIY Instructions:
- Apply the base coat to clean nails.
- Once dry, paint a neutral base color.
- Use the black nail art pen to carefully draw intersecting lines, creating a geometric pattern on each nail.
- Complete the look with a top coat for a lasting, glossy manicure.
This style is perfect for the fashion-forward individual looking to add an edge to their summer wardrobe while keeping it simple and chic.
Summer Blossoms
Photo reveals a tender approach to simple summer nails pink, where softness and femininity bloom with every glance. The short nails are drenched in a warm pink hue, suggestive of the tender inside of a seashell, or the blush of a summer sunset. Delicate white flowers, accented with golden centers, bring a dimension of depth and detail that’s as refreshing as the first sip of a cool drink on a hot day.
Consumables needed:
- Base coat (To protect the natural nail)
- Warm pink polish (Brand Recommendation: OPI’s ‘Pink Flamenco’)
- White and gold nail art polish (For the floral details)
- Top coat (For a protective seal and shine)
DIY Instructions:
- Start with a base coat to protect and prep your nails.
- Paint your nails with the warm pink polish, allowing it to dry completely.
- With a fine brush, create small white flowers, adding a dot of gold in the center of each for a bit of sparkle.
- Seal your floral design with a top coat for a long-lasting, glossy finish.
This look is ideal for a breezy summer day out or a casual gathering, providing a touch of natural elegance with a playful twist.
Marbled Mint
In image, the nails become a canvas for abstract expression, featuring swirls of green and white that mimic the mesmerizing patterns of marble or the swirling surface of a mint-flavored ice cream. The simple summer nails short style allows for a clean and understated look, while the swirling design adds a unique and eye-catching element that is both modern and whimsical.
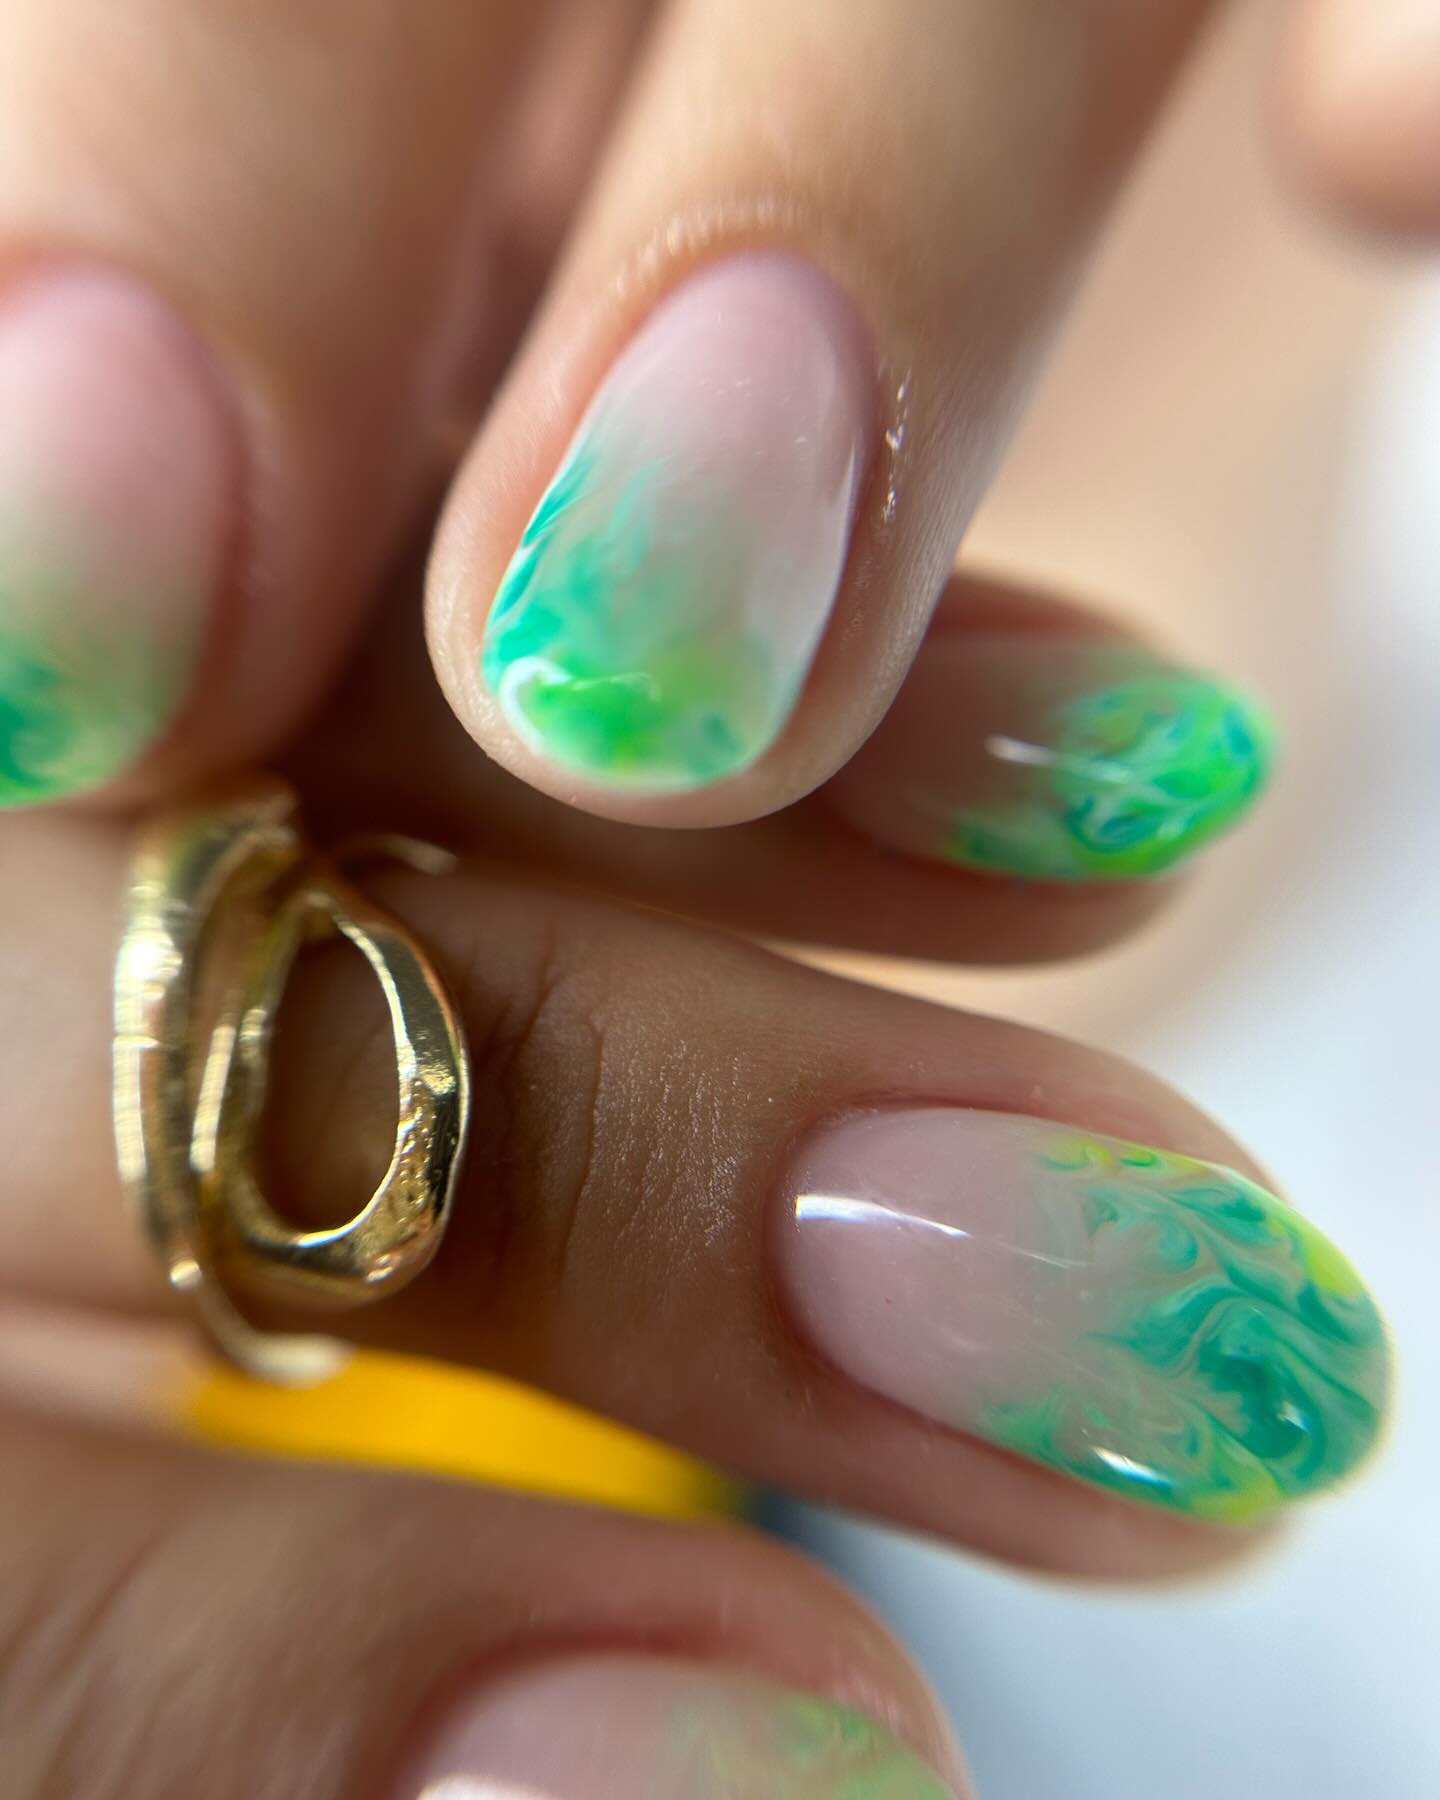
Consumables needed:
- Base coat (To start your manicure right)
- Light pink polish as a base color (Brand Recommendation: Essie’s ‘Muchi, Muchi’)
- Green and white nail polish for marbling (Brand Recommendation: China Glaze’s ‘Highlight of My Summer’ and Essie’s ‘Blanc’)
- A small bowl of water (For the marbling technique)
- Toothpick or dotting tool (To create the marble effect)
- Top coat (To seal in the design and add a glossy shine)
Geometric Glamour
The photo file presents a sophisticated spin on simple summer nails short with an emphasis on geometric precision. Here, we see short nails turned into a canvas for abstract artistry—a symphony of lines and spaces rendered in black over a nude pink base. It’s a testament to how simple shapes can translate into high fashion, turning the nails into an accessory as essential as the bold rings they’re paired with.
Consumables needed:
- Base coat (For a perfect beginning)
- Nude pink polish (Brand Recommendation: OPI in ‘Put it in Neutral’)
- Black striping tape or nail art pen (For the geometric patterns)
- Top coat (For a sleek, long-lasting finish)
This nail art, both sharp and chic, is for the one who walks the line between classic beauty and modern edge.
DIY Instructions:
- Prep your nails with a base coat for a smooth application.
- Apply two coats of the nude pink polish as a soft, feminine base.
- Use striping tape or a nail art pen to create bold geometric patterns on each nail.
- Seal your design with a top coat for durability and an extra gloss.
Soft Pink Blooms
In photo, the focus is on simple summer nails short that celebrate the season’s floral bounty. The nails are kept short and sweet, painted in a blushing pink that exudes warmth and femininity. Tiny white flowers with golden centers, seemingly scattered by a summer breeze, add a playful yet refined touch. This design pairs beautifully with the soft textures and gentle hues of a summer wardrobe, complementing both casual and elegant looks.
Consumables needed:
- Base coat (A solid foundation for your nail art)
- Blush pink polish (Brand Recommendation: Essie in ‘Muchi, Muchi’)
- White and gold nail art polish (For the floral details)
- A dotting tool or fine brush (To create the flowers)
- Top coat (To seal in the design and protect it)
DIY Instructions:
- Begin with a base coat to protect your nails and improve polish adhesion.
- Paint your nails with the blush pink polish, allowing it to dry between coats.
- With the dotting tool, add small white petals to form flowers, and dot the center with gold.
- Apply a top coat to ensure your simple summer nails art lasts through all your summer adventures.
Marbled Elegance
File introduces a mesmerizing simple summer nails concept where the artistry of marble is brought to the nail bed. These short nails boast an ethereal mix of white and soft green, swirled to mimic the natural veins of marble. It’s a dreamy, organic pattern that’s both understated and striking, offering a touch of artful intrigue to a simple summer nails short look.
Consumables needed:
- Base coat (For protection and longevity)
- White polish as a base color (Brand Recommendation: Sally Hansen Insta-Dri in ‘White On Time’)
- Green polish for marbling (Brand Recommendation: Essie in ‘Mojito Madness’)
- Marbling tool or toothpick (To create the marble effect)
- Top coat (For a glossy, finished look)
This design is a fresh take on nail art, perfect for those who appreciate the beauty in natural patterns and textures.
DIY Instructions:
- Apply a base coat to prep your nails.
- Use white polish as the base color for your marbled design.
- While the white polish is still wet, add a few drops of green polish.
- With a marbling tool or toothpick, swirl the green into the white to create a marbled effect.
- Once you’re satisfied with your design, apply a top coat to protect your nails and add shine.
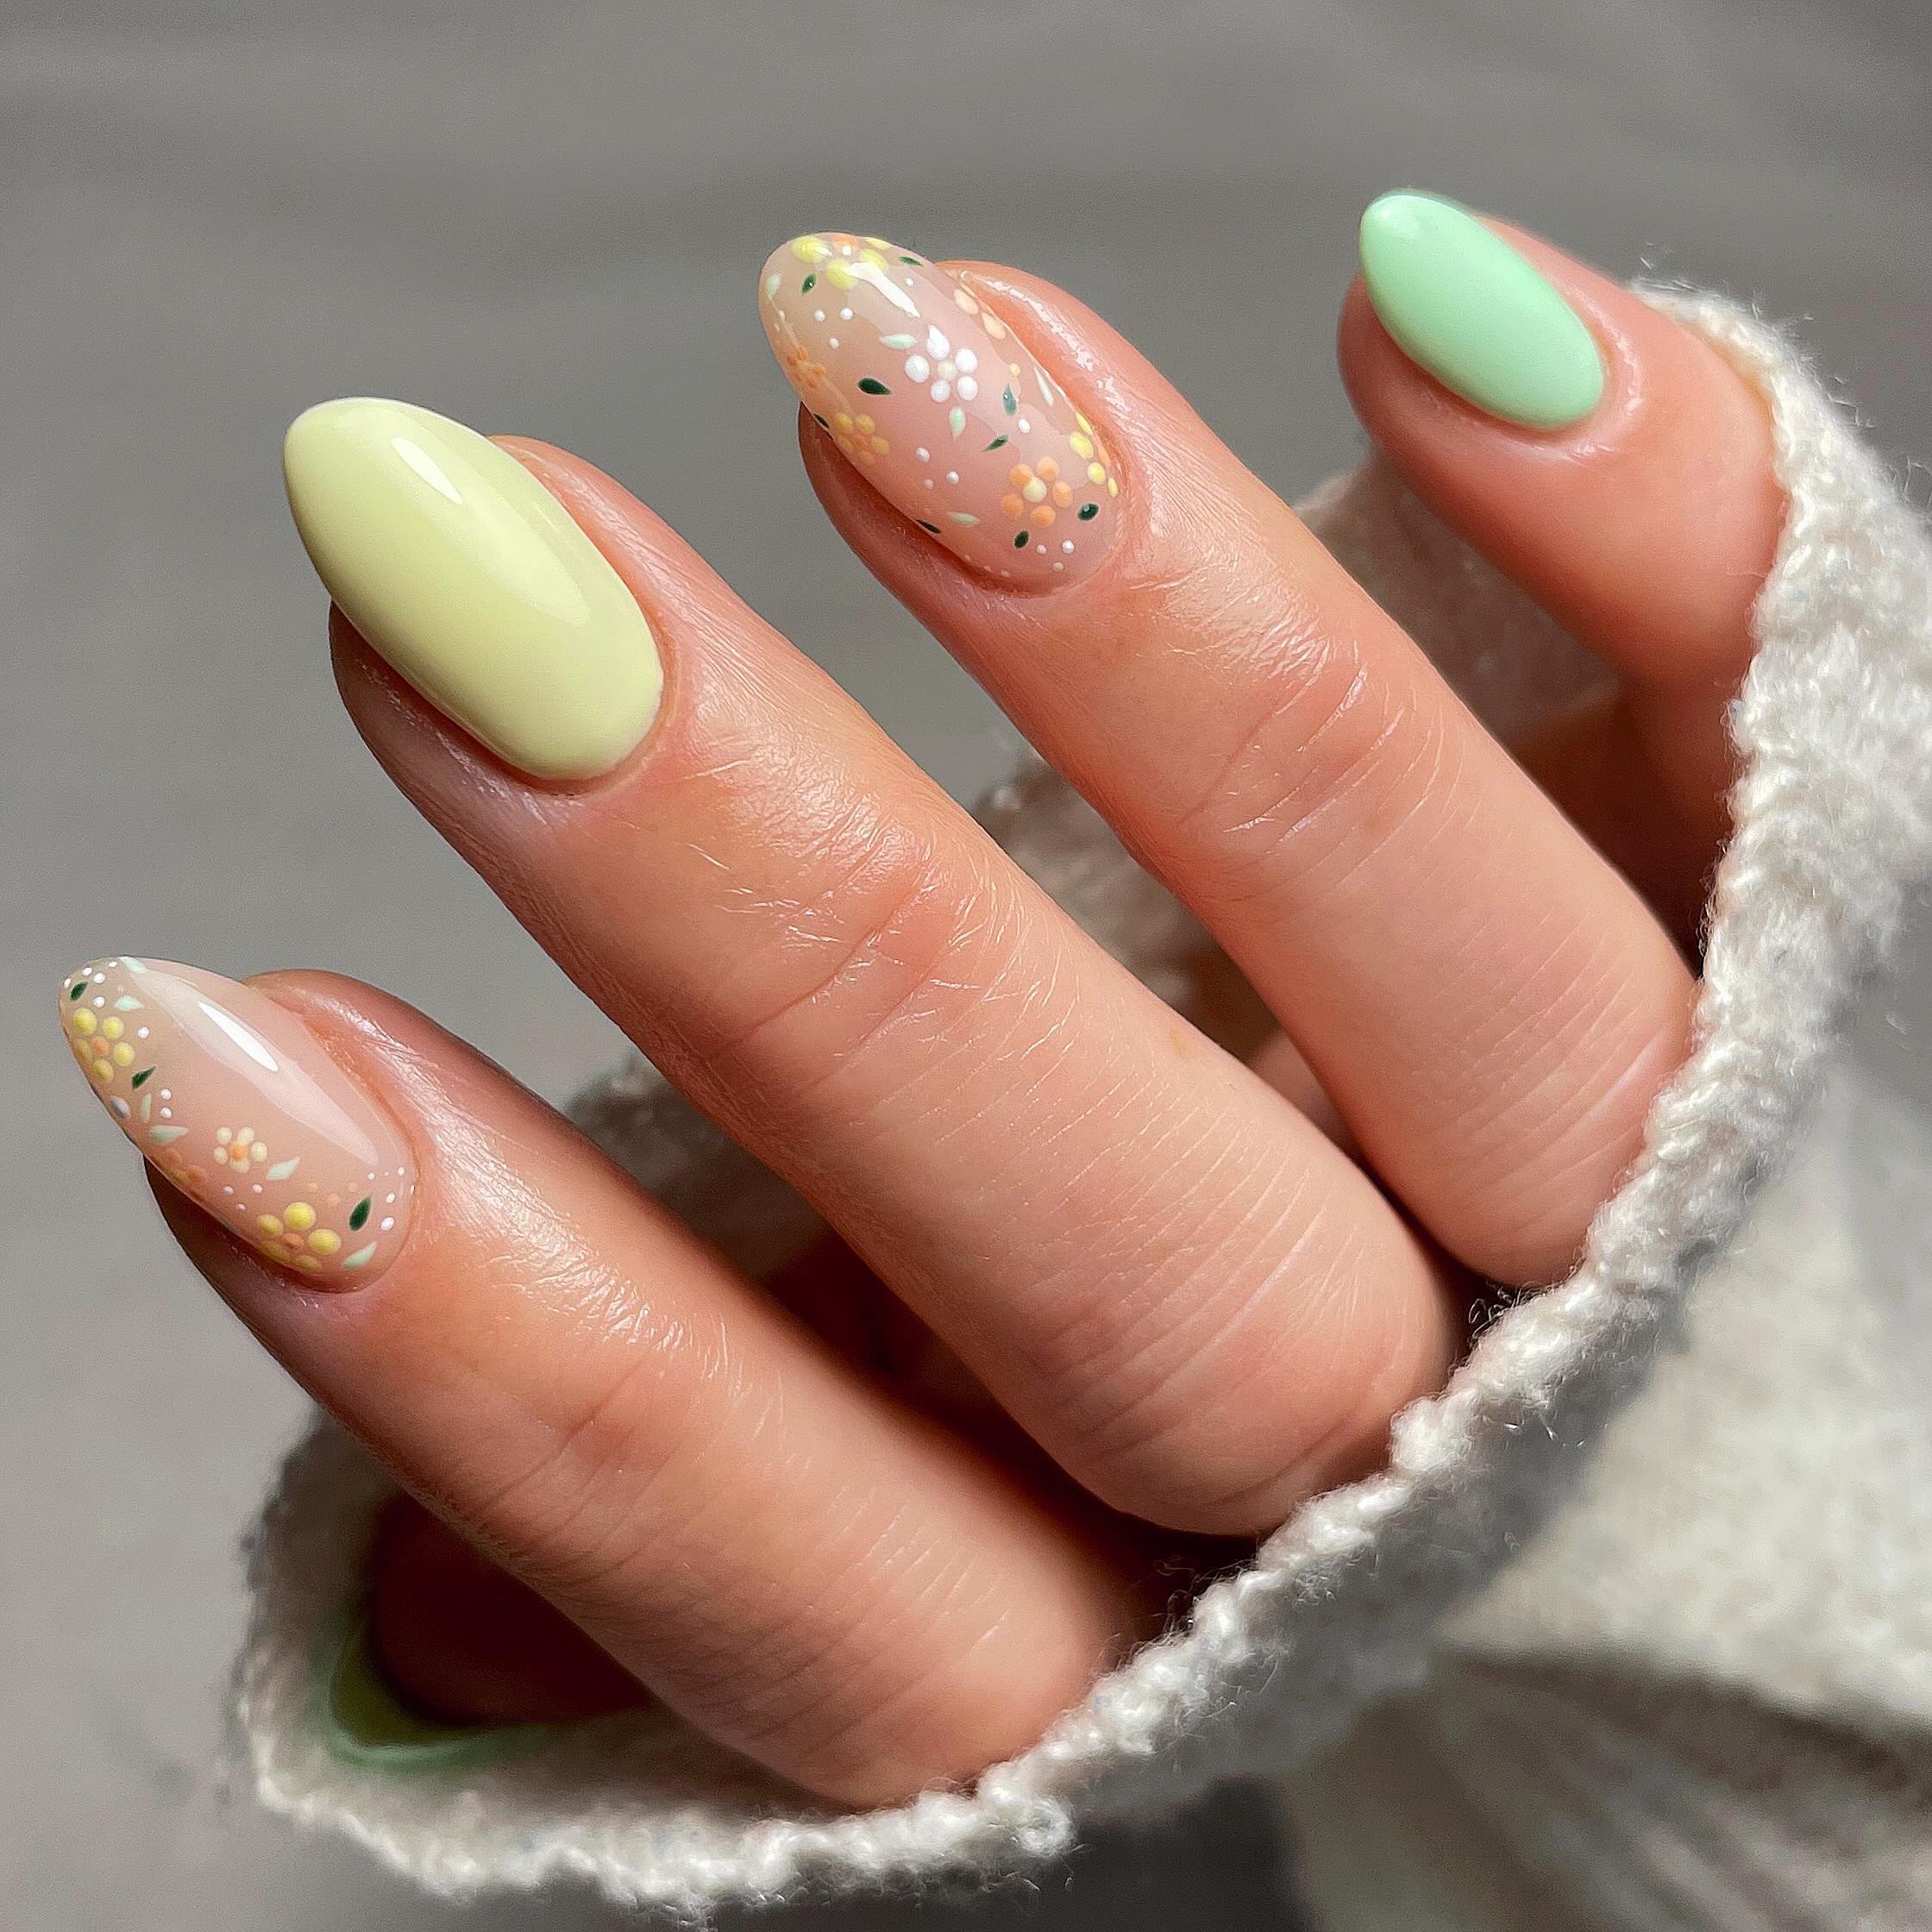
Spring Dots and Pastel Tones
The image titled photo brings a playful medley of simple summer nails almond to the forefront. These nails are an ode to the sprightly energy of spring with a summer twist, featuring almond-shaped nails in a variety of pastel hues. The joyous dotting of white and gold polka dots on translucent peach backgrounds evokes the image of the first daisy blooms under a soft sun, while a solid pastel green on the little finger is reminiscent of new leaves.
Consumables needed:
- Base coat (For smooth application and protection)
- Translucent peach gel polish (For the base of the dotted nails)
- Pastel green gel polish (For the little finger)
- White and gold nail polish (For the polka dots)
- Dotting tool or bobby pin (For creating perfect dots)
- Top coat (To seal in the design and ensure durability)
This look is ideal for those sunny picnics or lazy beach days, encapsulating the essence of a carefree summer.
DIY Instructions:
- Apply a base coat to protect your natural nail.
- For the dotted nails, apply two coats of the translucent peach gel polish, curing between each coat.
- On the little finger, apply the pastel green gel polish and cure.
- Dip your dotting tool into the white and gold polishes to create the polka dot pattern on the peach nails.
- Finish with a top coat to protect your nail art and add a shiny finish.
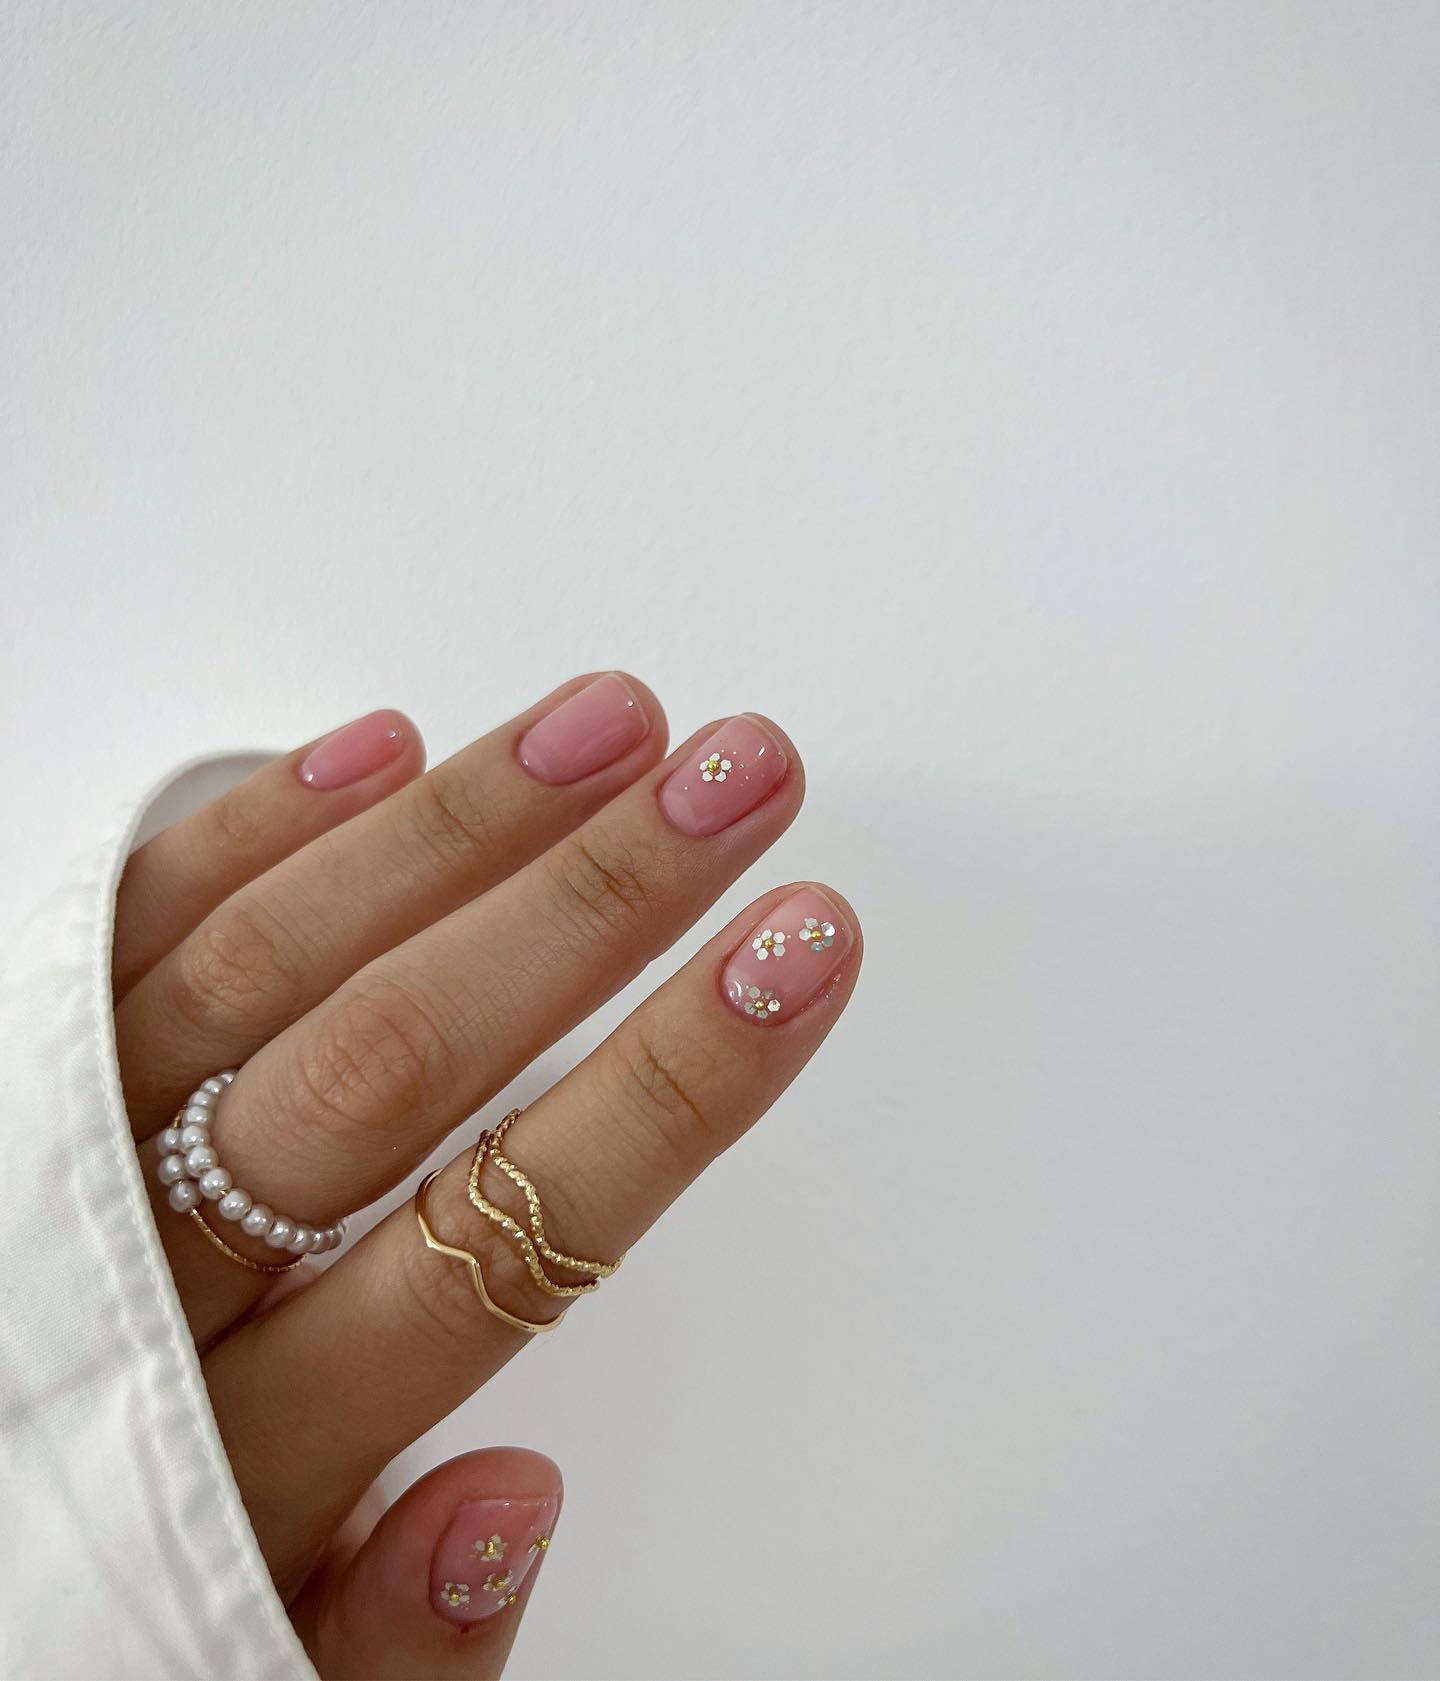
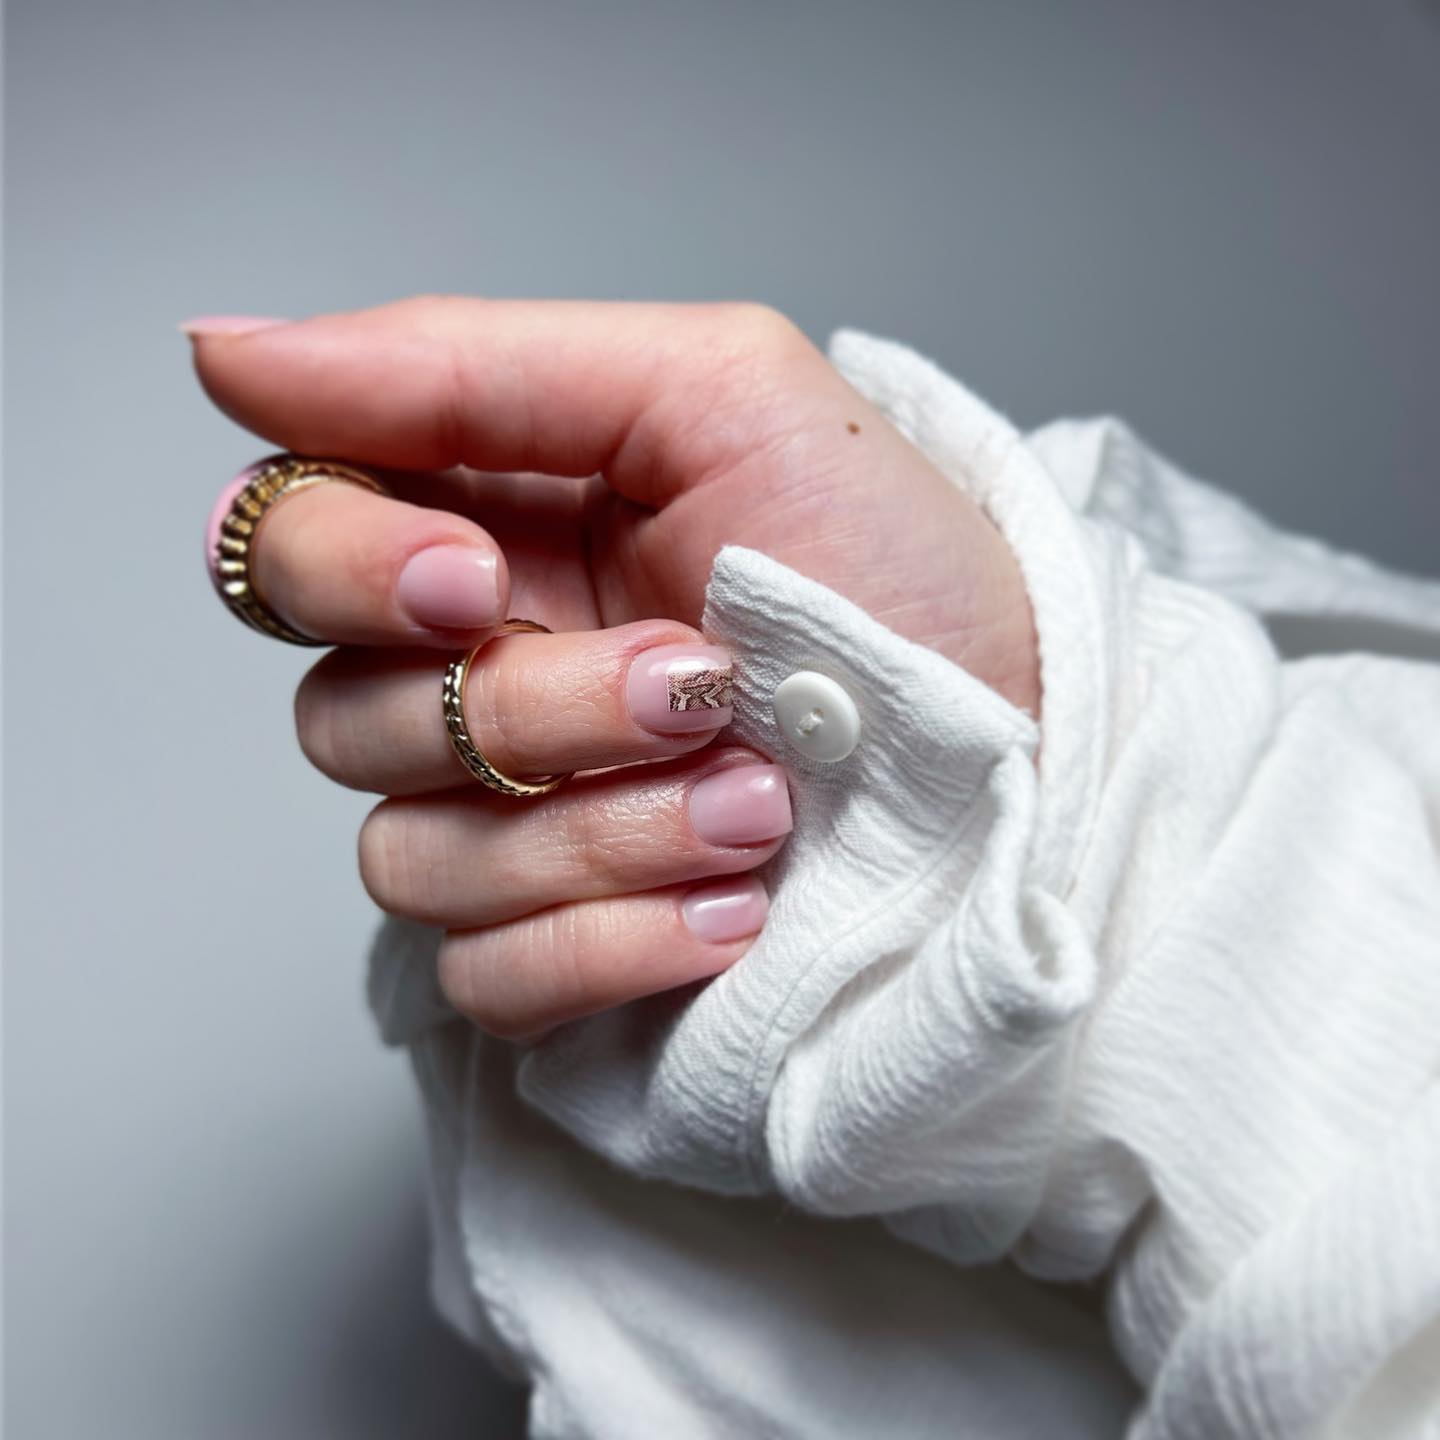
Gentle Pink Florals
The image file depicts a delicate approach to simple summer nails short gel, featuring a soft pink base adorned with dainty floral accents. This design captures the simplicity and sweetness of summer florals, with petite white blossoms and tiny gold flecks that bring a hint of summer meadows to mind. Each nail is a canvas for this miniature garden, blending seamlessly with the elegant jewelry accompanying the look.
Consumables needed:
- Base coat (A staple for any lasting manicure)
- Soft pink gel polish (For the base)
- White and gold nail polish (For the flower details)
- Fine detailing brush (To hand-paint the florals)
- Top coat (To ensure a glossy and protective finish)
Perfect for those who prefer their summer nails to whisper rather than shout, this manicure is sophistication personified.
DIY Instructions:
- Start by applying a base coat to protect your nails and ensure better adhesion of the gel polish.
- Apply a soft pink gel polish as the base and cure under a UV/LED lamp.
- Use a fine brush to paint white flowers, adding gold centers for a pop of color.
- Cure under the lamp once more before applying a top coat for lasting shine and protection.
Whimsical Pastel Swirls
Within photo, we find a refreshing and imaginative spin on simple summer nails short gel. This look is an embodiment of playfulness, with a swirl of pastel colors creating a marbled effect reminiscent of candy floss and summer daydreams. The blend of colors is seamless and soft, giving the appearance of clouds at sunset on a warm summer evening.
Consumables needed:
- Base coat (To begin with a good foundation)
- An assortment of pastel gel polishes (To create the swirl effect)
- A thin brush or toothpick (For swirling the colors)
- Top coat (To finish off with a protective, glossy layer)
This design is perfect for those who carry a piece of summer’s joy with them, turning their nails into a statement of creativity and whimsy.
DIY Instructions:
- Prepare your nails with a base coat for longevity.
- Apply a light base color and while still wet, add drops of various pastel polishes.
- Use a thin brush or toothpick to gently swirl the colors together to create a marbled effect.
- Cure under a UV/LED lamp and seal with a top coat for a smooth, glass-like finish.
Each nail design brings its own story and flair, perfectly suited for those balmy summer days and nights. Embrace these styles and let your nails showcase your personality and the joy of the season.
Neutral Tones and Delicate Designs
The photo file displays a collection of simple summer nails short gel that celebrate the beauty in neutrality. The nails are kept short and are painted in a variety of complementary neutral tones, each offering a unique twist on a classic look. A single nail stands out with delicate white petal designs, adding a subtle yet beautiful contrast to the simplicity. The warm beige and soft pink shades are a testament to the versatility of neutral nail art, suitable for any summer occasion.

Consumables needed:
- Base coat (For a solid foundation)
- A range of neutral gel polishes (For the base colors)
- White nail polish (For the petal accents)
- Fine detailing brush (For painting the delicate designs)
- Top coat (To ensure a glossy and enduring finish)
DIY Instructions:
- Start with a base coat to protect your nails.
- Apply your chosen neutral gel polish shades to each nail, curing between coats.
- On the accent nail, use a fine brush to paint delicate white petals.
- Once all designs are in place and dry, seal with a top coat for a lasting finish.
Pink Bloom Elegance
In image we are treated to a simple summer nails pink theme, featuring a glossy pink base with a single nail accented by a hand-painted floral design. The subtle pink hue serves as a perfect backdrop for the intricate blue and yellow flower, with added white dots to enhance its delicate features. This nail art exudes a sense of soft, summery elegance, making it an ideal choice for those seeking a touch of femininity.

Consumables needed:
- Base coat (Essential for long-lasting wear)
- Glossy pink gel polish (For the base layer)
- Blue, yellow, and white nail polish (For the flower and its details)
- Dotting tool or fine brush (For the floral accents)
- Top coat (To seal in the design with a protective shine)
DIY Instructions:
- Prepare your nails with a base coat to enhance the longevity of your manicure.
- Paint a glossy pink base on all nails, curing accordingly.
Save Pin